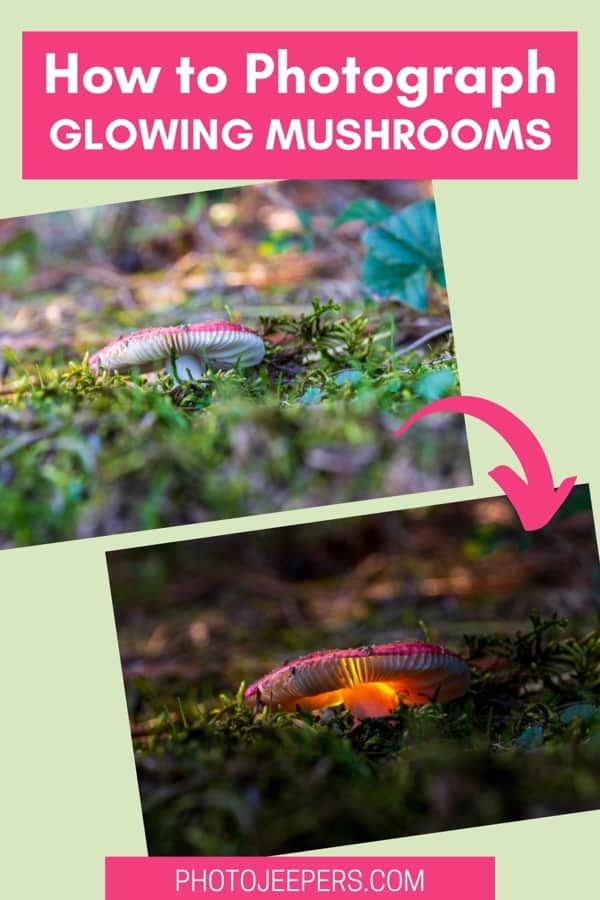
How To Photograph Glowing Mushrooms Plus a Simplified Editing Workflow
Our friend Ryan Hobbs shares his process on how to photograph glowing mushrooms, along with a simplified editing workflow!
This is a fun concept to use with other basic photography techniques to capture amazing photos of glowing mushrooms!
Glowing mushrooms are an easy and stunning addition to any portfolio. With minimal equipment, basic Photoshop skills, and a little time, anyone can create one of these enchanting images.

This site contains affiliate links which means WE may receive commissions for purchases made through these links. We only provide links to products we actually use and/or wholeheartedly recommend! As an Amazon Associate, we earn from qualifying purchases. Read the full Disclosure Policy.
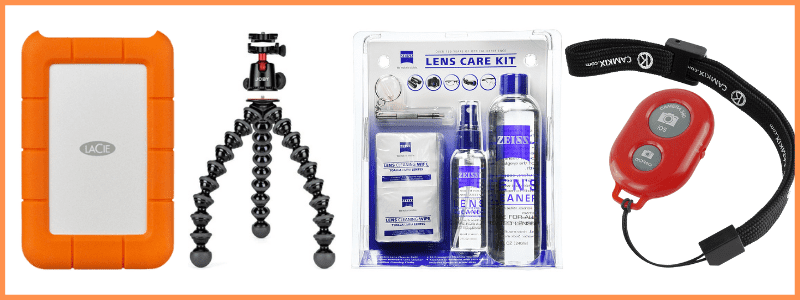
Equipment You’ll Need
What equipment do you need? Any camera, including a smartphone, will work. For the purposes of this tutorial, let’s assume that, whatever camera you are using, it is capable of taking raw images. JPEGs are not recommended as they can get weird compression artifacts from saving it repeatedly or from some of the processing techniques mentioned here.
Next up is the lens. Again, almost any lens will work (prime, zoom, macro, etc.) I recommend something less than 100mm focal length. Longer lenses have more depth of field compression. For larger mushrooms (or groups of them), this means it is more likely that you’ll have to take multiple images and focus stack them later. They also typically require greater minimum distance between you and the subject. Working along the forest floor, unobstructed views can be at a premium.
Other equipment you’ll need:
A good lightweight tripod that can get low to the ground. Beanbags can also be used to support your camera. I’ve even been known to use a handy stick I found on the trail to prop up my lens to get my angle just right.
A remote release is also a good idea as the act of pressing the shutter can subtly alter your composition or create motion blur in dimly lit scenes.
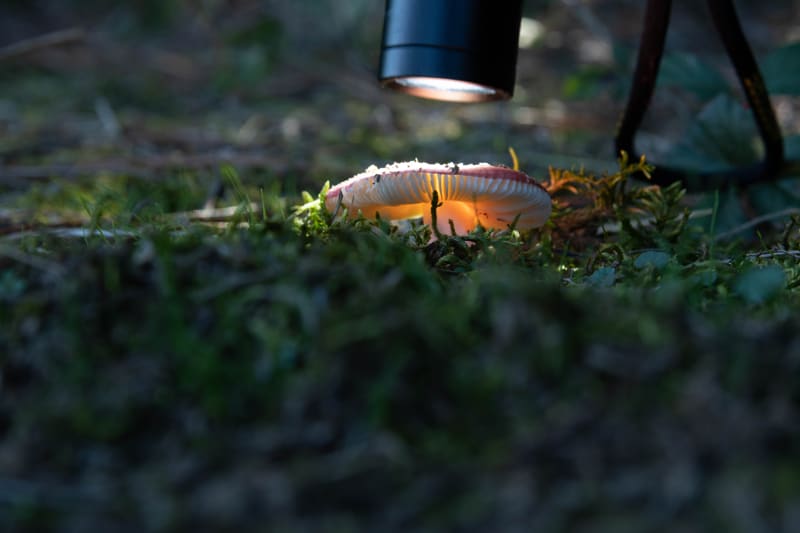
Last, you’ll need a light source, preferably one that can be focused to a tight beam. For smaller or translucent mushrooms, the flashlight on your phone might be sufficient. Larger mushrooms will need more lux to properly transilluminate them. There are a number of inexpensive handheld flashlights with a high lumen output that work quite well. I typically use a Coast HP7R flashlight, but I’ve also used a Mini MagLite or a Nitecore P12 (as well as my phone). Ideally, you want a flashlight with an adjustable beam and multiple power settings, although the later function can be simulated simply by changing your distance to your subject.
Camera Gear at B&H Photo
How to Photograph Glowing Mushrooms
First, let me state, I am not an expert on many things, and photography certainly isn’t one of them. However, what I do know, I’m willing to share. If you want to learn more, there are some great in-depth tutorials available online from some real masters of the art like Daniel Laan and Dirk Ercken.
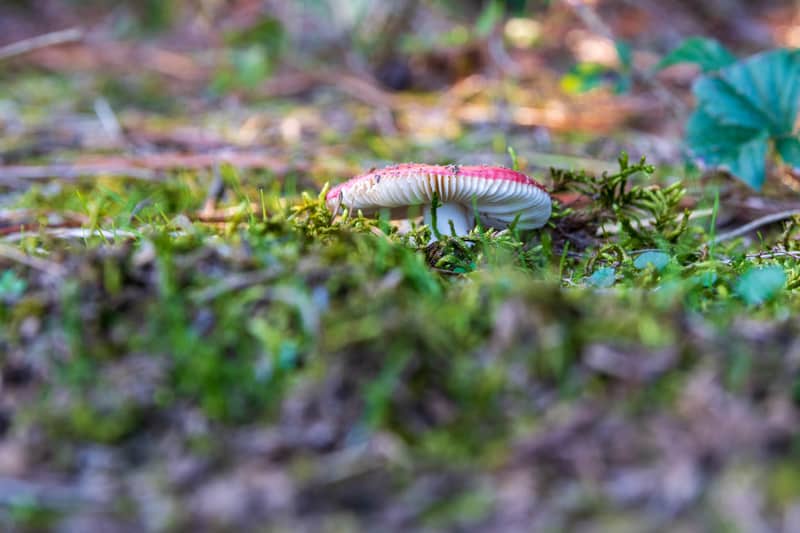
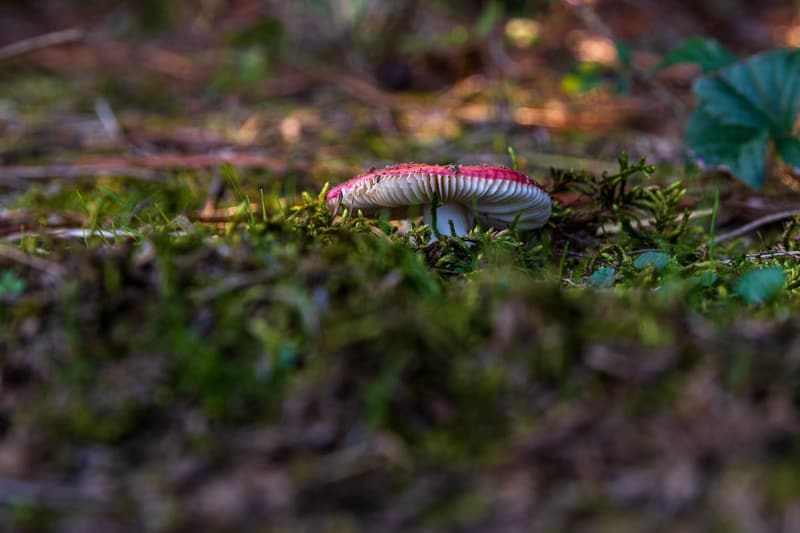
Here’s my process to take your photos from this:
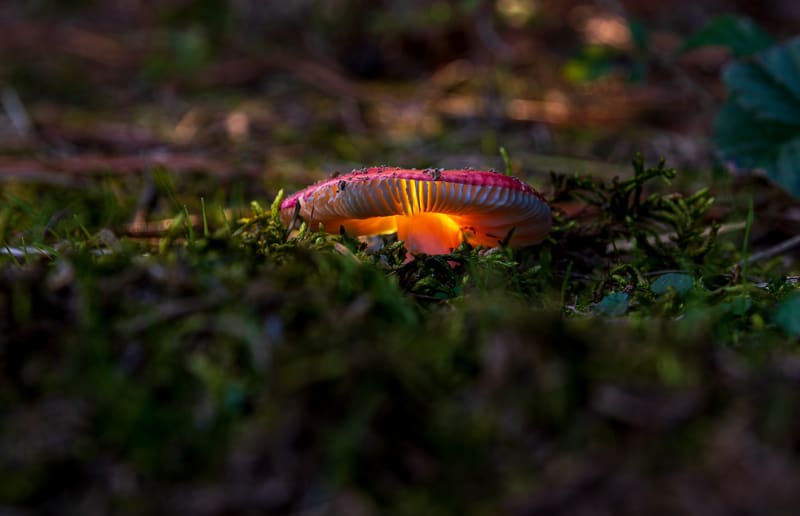
to this:
Capturing Your Images
Mushrooms can be found almost anywhere: forest floors, fields, backyards, even along sidewalks. Try to avoid capturing your images under direct sunlight as it will reduce the effect you are trying to create. The ideal location will have the mushroom on higher ground, e.g. a fallen log or a slope, in order to get a view of the underside of the mushroom cap. Check the mushroom with a flashlight to make sure it’ll transilluminate. Polypores and shelf mushrooms tend to be woodier and more difficult to light up. However, it’s still worth experimenting. I’ve gotten images of these in the past in which the body of the mushroom was opaque but the edges looked like they were dusted with glitter.
When composing your image, use as wide an aperture as you can, even if you end up needing to focus stack several shots, as that will leave your background nice and blurry. Once you’ve composed your shot, you’ll want to underexpose your base image slightly. Take a test shot and look at your histogram. Without clipping your shadows, try to get the curve centered in the histogram (or even a little to the left, depending on the scene). To do this, you may need to set your exposure compensation to anywhere between ⅓ and 1.5 stops underexposed. (Don’t forget to use your remote release once you’ve composed your shot to minimize minor changes to your composition between frames.)
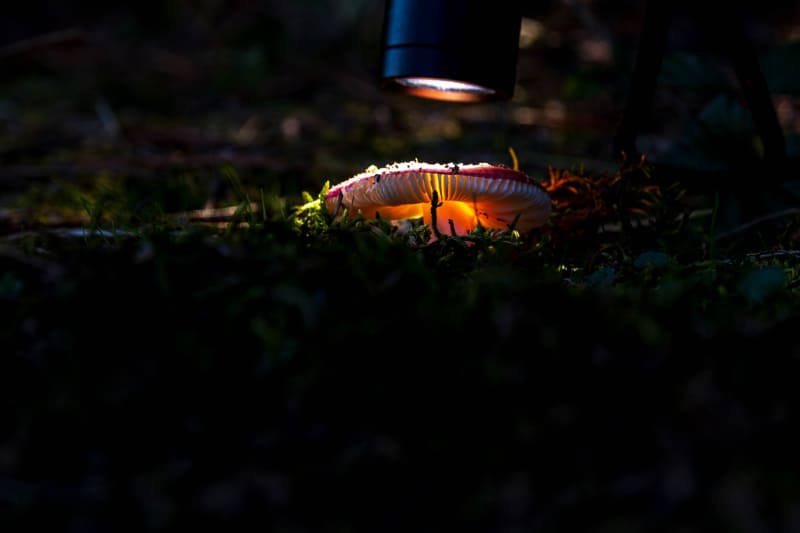
After you have successfully captured your base image(s), and without moving your camera, use your flashlight to light up the top of the mushroom from above and slightly behind. Avoid directing the flashlight beam toward the camera to reduce the risk of lens flare. Larger mushrooms will require multiple frames to light up the entire cap. Focus on a different area with each shot, with significant overlap, until you are satisfied you have transilluminated the entire mushroom (or group of mushrooms).
For the example in this tutorial, I found a small mushroom on a slight slope. Although I took several additional frames lighting up the cap from various angles, I found I only needed one “light” frame to get the effect I desired.
Editing The Base Image in Lightroom
So, you’ve captured your mushroom images. Now what? I typically edit mine first in Lightroom, but that’s a function of what I’m most comfortable with. I’ve used Lightroom for a long time. You can just as easily (perhaps, even more easily) do this stage in Adobe Camera Raw or Adobe Bridge prior to opening the images in Photoshop.
First things first. Open your images in your basic editor of choice. Again, mine is Lightroom. I always start with my base image. My workflow is to get some of the global changes made first. In this case, I apply my Lens Corrections right up front. I’ll follow this with the Camera Profile. Here you have a choice: Adobe Landscape will boost the separation of color tones in your image while Adobe Standard will reduce or flatten them. Both profiles have advantages for these types of images. It just depends on what look you’re going for. I went with Adobe Landscape to really make those colors stand out more.
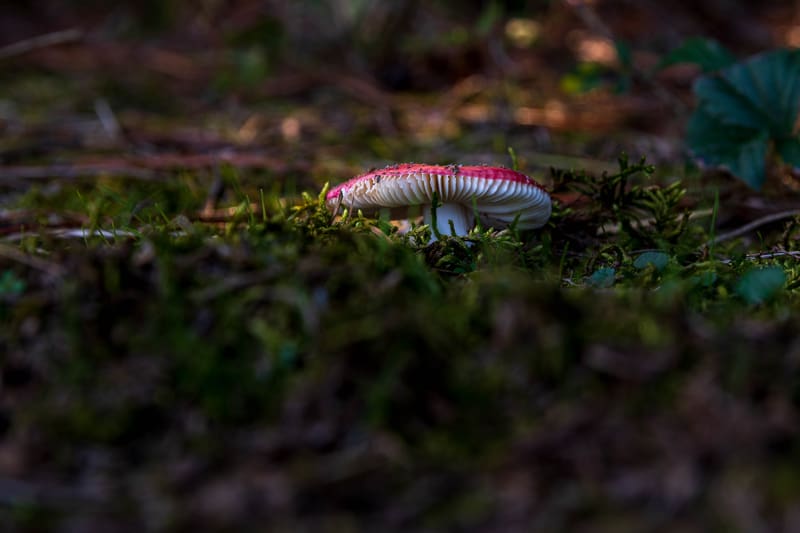
The software has gotten substantially more sophisticated versus the early days of the program. So, to speed up my workflow, I’ll typically apply Auto Settings. If I like it, great. If not, I can undo (Ctrl-Z or Cmd-Z) or modify them. At this point, my image looks this:
It’s already looking a bit better; but, for me, it looks too…happy. I want a moodier look in the image. To do this, I’ll adjust my White Balance. Again, I can start with Auto and back up if I don’t like it. However, for this image, I have a little bit of white in the image that I can work with. Using the eyedropper, I select the white portion of the mushroom stipe (or stem). From here, I opted to make the image a little warmer by increasing the White Balance and Tint to make the reds and yellows stand out. (Another option would be to go cooler (lower white balance and greener tint). Especially with filtered ambient light in the background, this can create a nice ethereal effect.)
From here, you can make local adjustments to Highlights, White, and Vibrance. I like to bump mine a little to help the mushroom stand out when I darken the background in the next step. In the HSL/Color panel, I may also increase my Saturation of greens and yellows as well as reduce the Saturation of blues. (This will affect the entire image.)
The foreground here is already pretty blurred since I had such a narrow depth of field. If it wasn’t, I would add a Graduated Filter to decrease the exposure and clarity of anything in front of the mushroom.
Using a local adjustment brush, increase the Texture and Clarity of the mushroom tops to sharpen them. If there are any background highlights you want to emphasize (the sky or a ray of light, for example), you can make another local adjustment and increase Blacks slightly to give it some “glow” or drop your Texture to give it a softer bokeh effect.
I will then add a Radiant Filter over all of the mushroom(s) and drop the Texture outside the filter area to simulate increased bokeh. Then, I’ll come back to Split Toning (Color Grading in the latest version of Lightroom) and make the Shadows a little bluer and more saturated.
For me, the last thing I typically adjust is Sharpening. With these images, I also add a little Vignetting to further focus the viewer on the mushroom. After all that, I’ll end up with an image that looks something like this:
I’ll sync these settings across all of the images in the series that I plan to use. Before moving on to Photoshop, I’ll check the Highlights and adjust them in each image as necessary to preserve detail. In this case, the transilluminated mushroom image ends up like this (It’s okay that it looks mostly dark. What you want to see is that the inside of the mushroom cap is properly exposed, not the rest of the image necessarily.):
Blending The Layers in Photoshop
This is where the magic really happens. If you’ve taken multiple images of your base layer, here’s where you’ll focus stack them. (You can also use a dedicated focus stacking program like Helicon Focus, which is available as a stand-alone program and as a plugin from Lightroom or Photoshop.) In Photoshop, load all of your base photographs as layers. Select all of the layers and go to Edit>Auto-Blend (Blend Mode>Stack, Seamless Tones and Content Aware both checked). You can create a Group in Photoshop, add all of these layers, and simply rename the group Base Image if you would like.
Let’s move on to the transilluminated (“light”) layers. Open each image in Photoshop as separate layers with your base image/group as the background, or bottom, layer. The first step is to make sure slight movements between frames are corrected as even slight offsets can mess up your exposure blending. Under Edit, select Auto-Align Layers. I find Projection>Auto does a pretty good job and just pick that one. Now the software will attempt to align all of your layers.
Once this is done, you can turn off all of your layers except for the base. Turn on the next layer and change the Blending Mode to Subtract to make sure it is aligned to your base. If you need to make adjustments, you can use the Move Tool and your arrow keys to fine tune the alignment. (It helps to zoom in on your canvas to really focus on the edges of the underside of the mushroom cap.) Once aligned, turn off the second layer and turn on the third layer. Compare each layer above it, one at a time, with the base until you are satisfied they are all aligned. For this image, there are only two layers and alignment is pretty easy.
For each light layer, create a Layer Mask and invert it (Ctrl-I or Cmd-I). Using a white Brush Tool (hardness 0, opacity 100), brush back in details from this light layer. Be careful not to brush in any areas that aren’t illuminated. Repeat for each light frame. (Note: Don’t forget to pay attention to areas under the mushrooms that may be lit up as well to improve the overall effect.) You may find it easier to turn off the frames you masked in order to focus just on the current light layer you are blending.
Create a new layer and set the Blending Mode to Soft Light. Using a white Brush and decreasing the Opacity substantially, brush under the mushrooms to create a subtle burning in lights under there.
Create additional layers as necessary to adjust Brightness/Contrast, Exposure, Curves until the image is fine-tuned to your satisfaction. You may wish to add a layer mask to these and, with a big feathered Brush, mask out the foreground/background to keep these adjustments localized to the mushroom(s). (Careful readers will also notice I removed a blade of grass that was unfortunately positioned directly in front of my mushroom. General image editing is beyond the scope of this tutorial, but there are plenty of resources available to address this. Nonetheless, this was done using a combination of the Clone Stamp and Spot Healing Brush.)
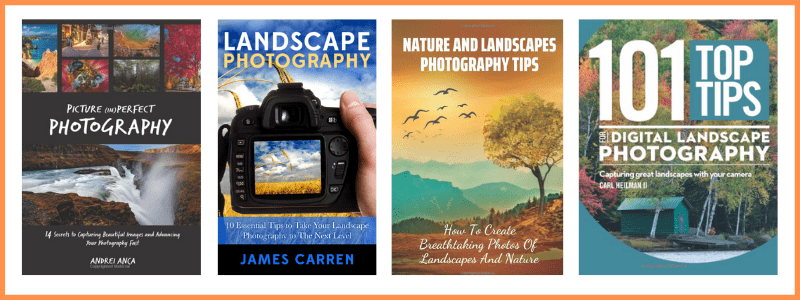
AMAZON Landscape Photography Books: