Lightroom: 5 Photo Editing Tips to Improve Your Travel Photographs
Here are my 5 photo editing tips and reasons why Adobe Lightroom is considered an essential piece of travel photography gear!
So this will NOT be your typical How To Use Lightroom article. Instead I would like to share my story about why I use Lightroom to edit my photos.

This site contains affiliate links which means WE may receive commissions for purchases made through these links. We only provide links to products we actually use and/or wholeheartedly recommend! As an Amazon Associate, we earn from qualifying purchases. Read the full Disclosure Policy.
The advent of digital cameras certainly revolutionized photography. For me the real revolution came in my discovery of photo editing software such as Lightroom.
Currently I integrate Adobe Lightroom and Photoshop as part of my normal photo editing process to accomplish my final vision for all my images.
The Adobe Creative Cloud Photography Plan includes Lightroom and Photoshop. This is the best photo editing software for me.
I shoot in raw and make every effort to make sure my images are dialed in at the time of capture so that composition, light, and subject are all what I envision.
When I enter my 21st century dark room, my office, I use Adobe Lightroom to begin the final step of the image creation process.
My Story
I am a photographer with a varied history of experience and levels of expertise.
As a teenager, I focused solely on attempting to permanently capture special memories or moments that made an impression upon me personally.
I had no training or expertise. I did not even comprehend basics such as the rule of thirds.
Looking back on those old pictures I don’t see any images that are inspiring or contain any level of “wow factor”. They are still, however, important to me from a sentimental viewpoint and certainly serve the purpose for which they were captured.
I bring these old photos into this discussion because their relevance lies in the foundation they provide to all my current endeavors.
I look on my development as a photographer as an extensive line of baby steps that encompassed decades.
The images I shoot today are certainly of a much higher quality due to better equipment and increased knowledge, but I still see the influence of those early images. They are the heart and soul of my current work, the basis of my passions.
I photograph what impacts me as a person and as an artist. That individual style forged from the heart is what truly makes the difference in the images we produce.

5 PHOTO EDITING TIPS USING LIGHTROOM
Organization and Selection
Adobe Lightroom software is a powerful tool for image organization, but the full potential is not easy to grasp.
The first Lightroom photo editing tip is to determine the photo organization method that works best for YOU.
Here are some wonderful resources for you to learn all about organization in Lightroom:
- How to Organize Photos in Lightroom
- 10 Tips to Better Organize Your Photos in Lightroom
- Digital Photography School Post Processing Resources
- Digital Photography School Lightroom Mastery Course
When it’s time to select the images I want to process, the layout of the Lightroom work window is very conducive to evaluating and choosing images you want to keep or discard. It allows me to easily move from one image to another as I compare and critique them.
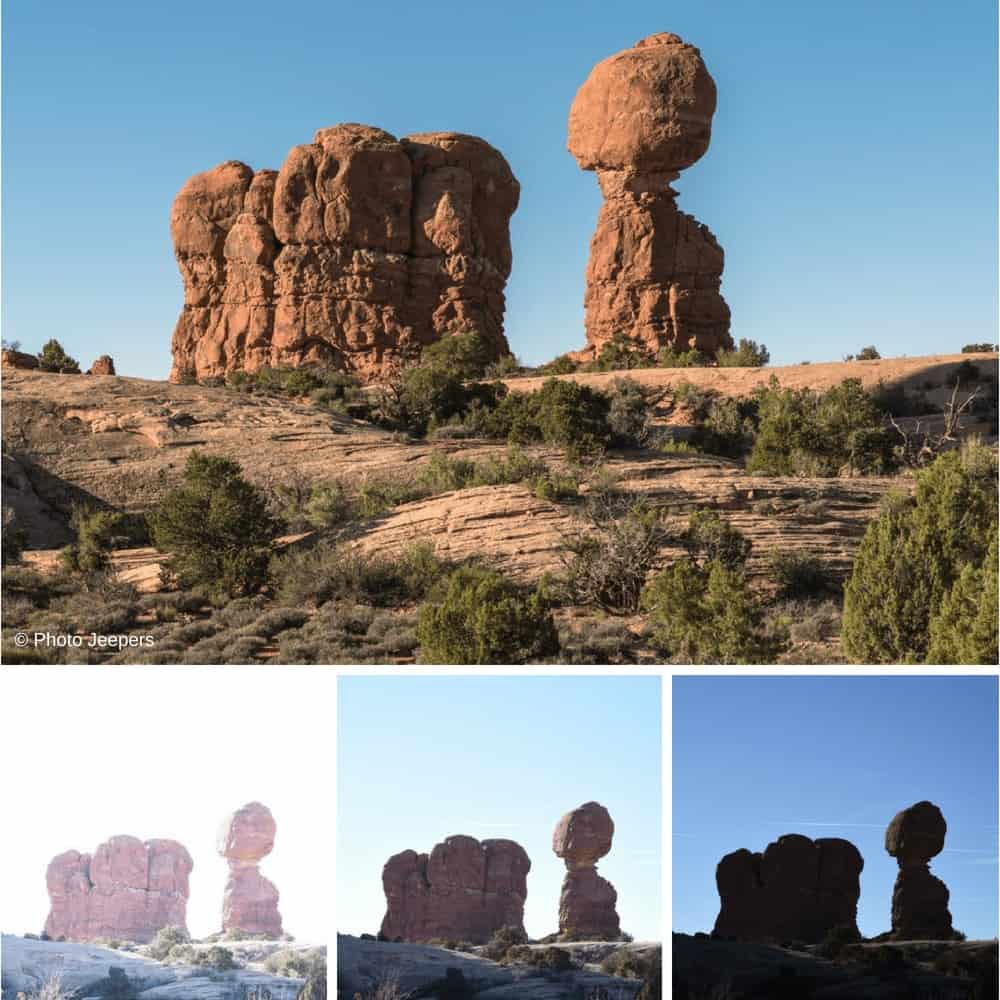
Color and Mood Creation
Color and mood creation is another Adobe Lightroom photo editing tip.
Lightroom allows you complete control over image aspects such as contrast, exposure, and highlights. The software also provides many options pertaining to color and shade.
I find Lightroom to be easier, quicker, and more complete than Photoshop in basic photo editing.
Black and white, sepia, or altered temperature images can be easily created with presets or tool bars.
Lightroom allows you to create or download setting presets so you can complete the photo editing with one click!
Brush Corrections
Adobe Lightroom also provides many brush options that allow a great deal of detailed photo editing.
Brush corrections is my third Lightroom photo editing tip. We all have images that contain flaws within specific portions of the photo that detract but do not destroy.

A good example of this would be one that I have dealt with in photographing bald eagles on occasion. It can be easy to capture the image with the bald eagle head too bright with no highlights, as seen above.

When I set the palette brush to highlight adjustment, it allows specific correction to the eagle’s head to bring out the detail without affecting the rest of the image.
The various palette brushes available within Lightroom allow a great deal of artistic expression in establishing a mood or message within your photo.
HDR and Panorama Creation
I enjoy using the HDR and Panorma functions in Lightroom, so they are photo editing tip number four.
HDR (High Dynamic Range) imaging uses three photos, taken at different exposures, to create a more complete image.
You use editing software like Lightroom to put those three pictures together and highlight the best parts of each photo.
Lightroom is a tremendous tool for creating a panoramic image.
Once the challenging field work of capturing the various images is complete, the software easily merges those photos of a landscape into a breathtaking panorama.
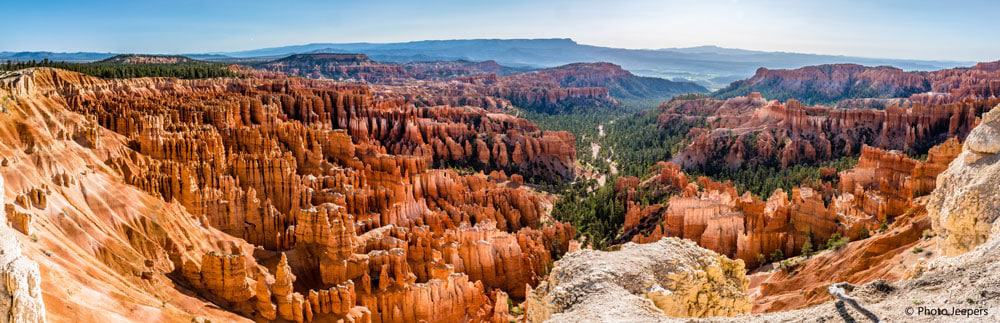
You can see a quick preview of the panorama and make adjustments to it before the merged image is generated, making it simple and user friendly.
Repair and Tools
This last photo editing tip is a bit more advanced, but so important when you have to do major repair or alteration work.
I use Adobe Photoshop to make repairs or alteration.
I complete all my basic photo editing in Lightroom, move the image to Photoshop for any major repair or alteration I want to do, then save the image back to Lightroom.

In the photo above, I wanted to remove the person hiking underneath Double Arch at Arches National Park. I circled the hiker in the photo.
First, I applied the landscape presets I like to use in Lightroom, then moved the image to Photoshop where I removed the hiker.

After removing the hiker, I saved the image back to Lightroom and saved the completed photo.
Adobe Lightroom itself has many repair features that are quick and helpful that don’t require the use of Photoshop. The software provides exceptional spot removal, red eye repair, and cropping tools. There are also tools for noise reduction and sharpening that are very effective and easy to use.
For me, the discovery of Lightroom was the capping stone in my creative process. I had used Photoshop for years, but incorporating Lightroom into my photography repertoire dramatically improved my organization and processing speed.
The key is to determine what photo editing process and software is best for your photography style.


Many many thanks for sharing such a superclass tips about photo editing. No doubt! I am so much impressed by your tips. keep posting such kind of information on your page. I will certainly dig it and personally suggest to my friends. I’m sure they’ll be benefited from this website.