Two Days in Zion National Park: Itinerary & Guide
Located in southwestern Utah, Zion National Park is known for its dramatic canyons, towering cliffs, and forested plateaus. We always recommend spending at least two days in Zion National Park!
At Zion National Park, you can enjoy a wide range of activities including hiking iconic trails like Angels Landing and The Narrows, exploring scenic drives, participating in canyoneering and rock climbing, stargazing, horseback riding, and engaging in guided tours and educational programs. Use this Zion National Park travel guide to plan your 2-day trip: activities, best time to visit, what to pack, and where to stay.

We live hours away, and have visited the park at various times of the year. When planning a visit to Zion Reef National Park, the amount of time you should spend there depends on your interests and activities.
We’ve created some done-for-you itineraries for visiting Zion depending on the time you have to spend at the park. Click the graphic below to get a free travel bundle that includes printable daily itineraries.

This site contains affiliate links which means WE may receive commissions for purchases made through these links. We only provide links to products we actually use and/or wholeheartedly recommend! As an Amazon Associate, we earn from qualifying purchases. Read the full Disclosure Policy.
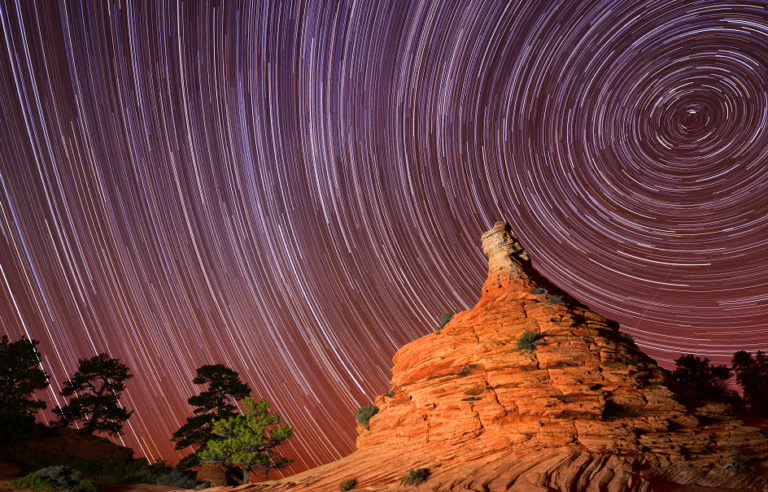
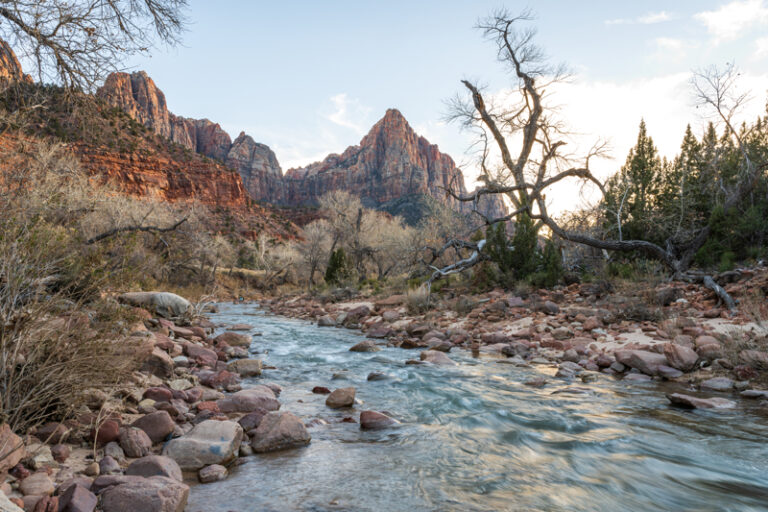
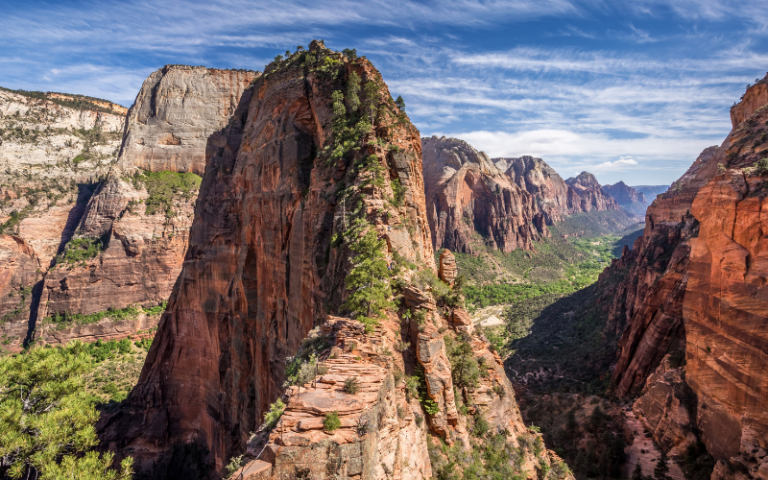
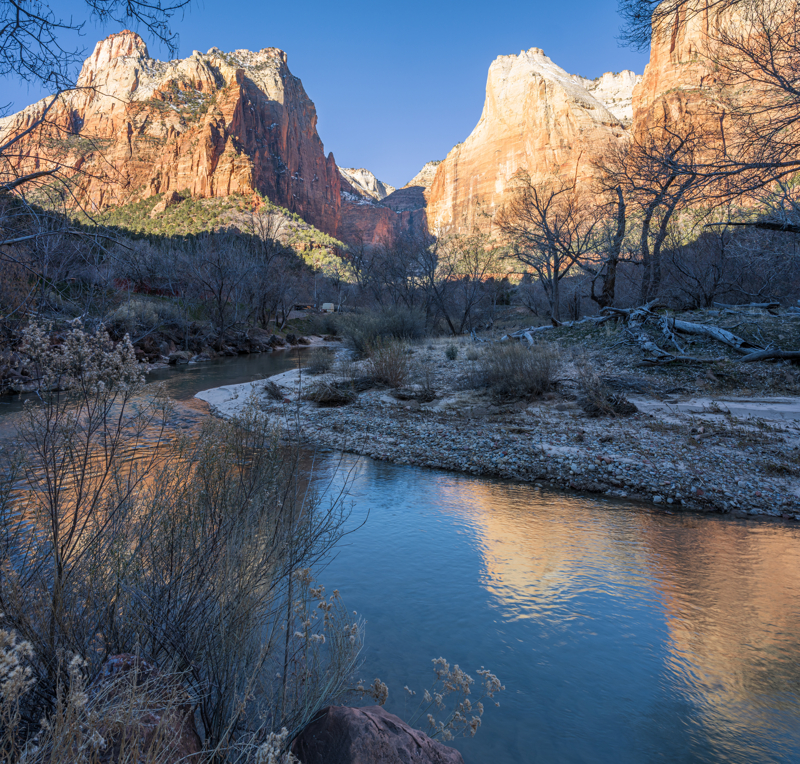
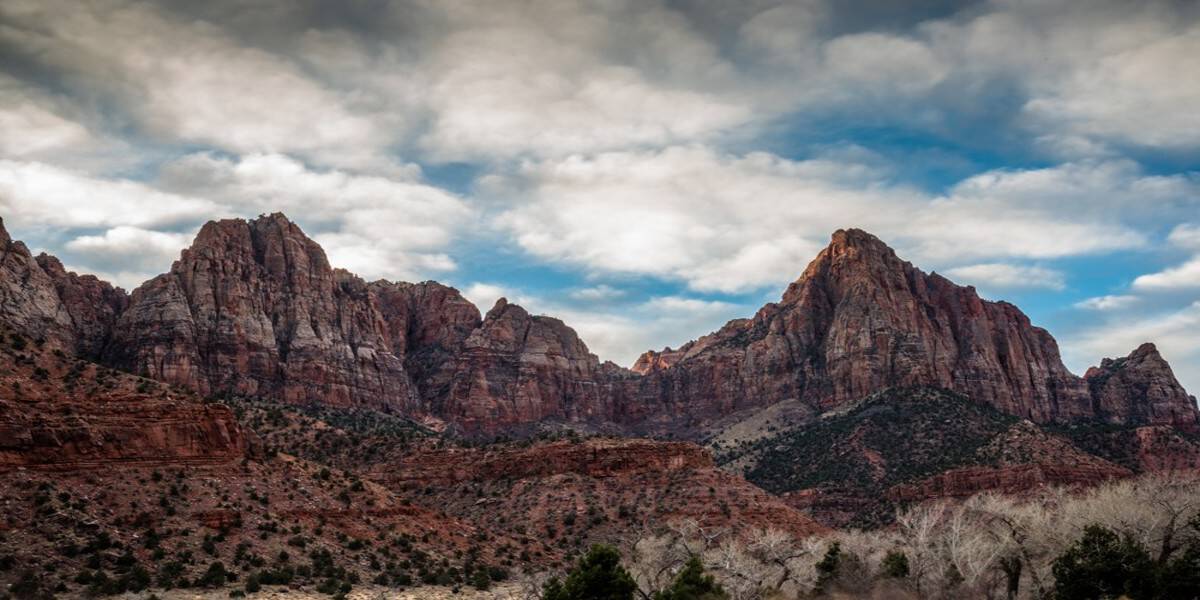
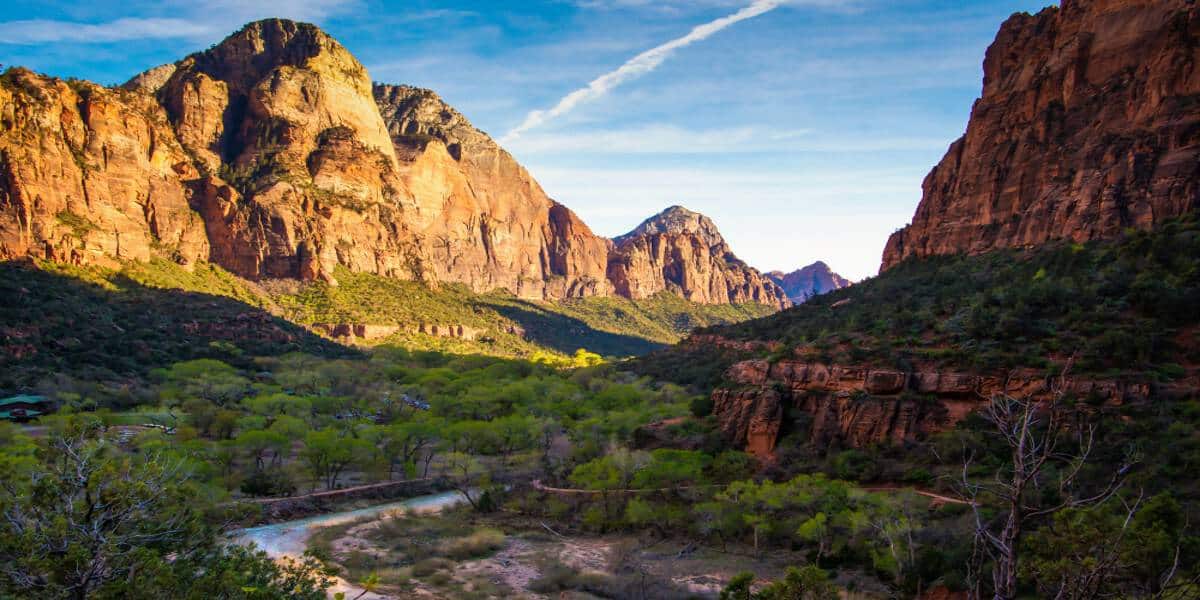
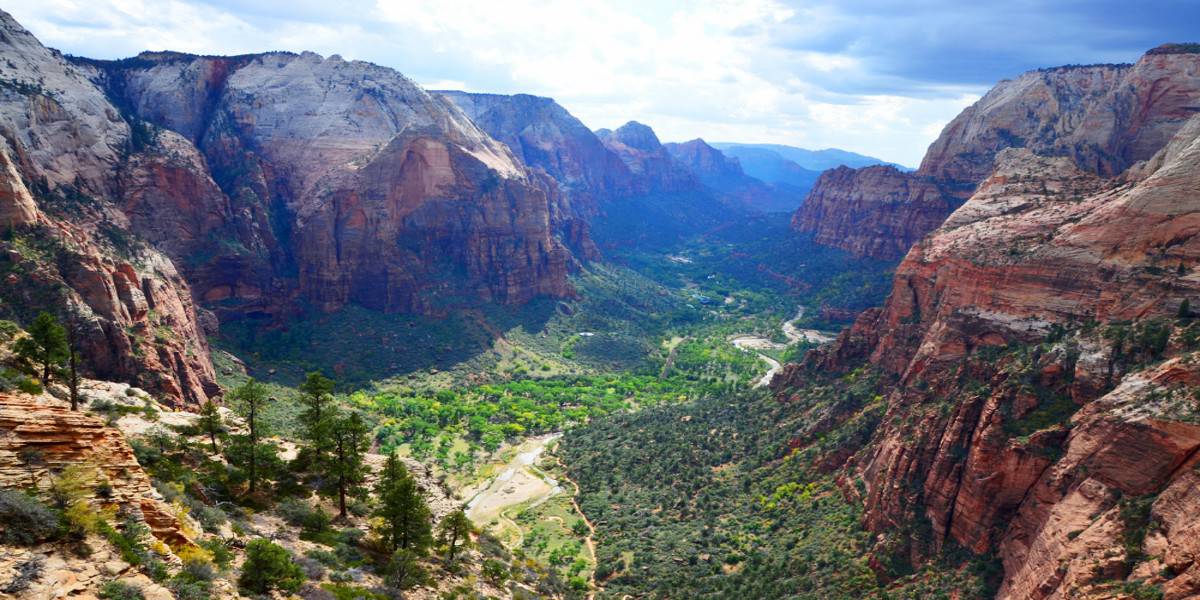
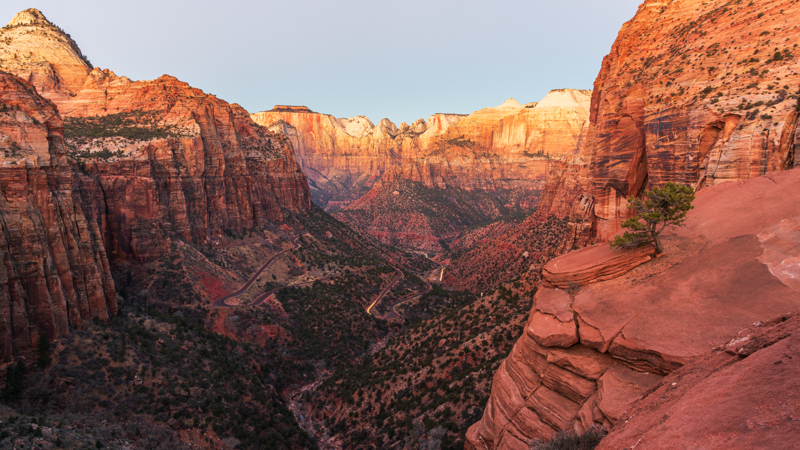
A Photo Tour of Zion National Park
Take a visual tour through Zion National Park to see the stunning landscapes you’ll see when you visit!
Best Time to Visit Zion National Park
If you’re wondering about the best Time to Visit Zion National Park, below you’ll find specific information about what it’s like at different seasons and months of the year to help you decide.
You’ll also find links to different articles we’ve written about each season or month specifically: Zion National Park weather, services, and things to do that time of year.
Spring Weather at Zion varies quite a bit from month to month. It’s important to pack for all types of weather because you never know when the weather will change.
- Zion in March: Highs 66 | Lows 39 degrees F
- Zion in April: Highs 75 | Lows 45 degrees F
- Zion in May: Highs 86 | Lows 50 degrees F
It is not unusual to get rain or even snowfall in March. We recommend you watch the weather and pack a winter coat, winter hat, and winter gloves when going to Zion in early spring. A fleece jacket, hat, and gloves should be fine later in the spring.
Spring is a busy time so you’ll need to use the Zion National Park shuttle system!
Summer Weather at Zion will be HOT HOT HOT! Since the temperatures are brutal this time of year, plan your outdoor activities for the cooler mornings and evenings!
- Zion in June: Highs 95 | Lows 63 degrees F
- Zion in July: Highs 100 | Lows 68 degrees F
- Zion in August: Highs 100 | Lows 68 degrees F
With the hot temperatures during the summer months, you’ll want to protect yourself from the sun by wearing a sun hat, sunscreen and sunglasses. It’s important to stay hydrated and carry a hydration pack or a refillable water bottle in your backpack.
Summer is a great time to enjoy the AC as you explore the three Zion National Park scenic drives where you can drive private vehicles and avoid using the shuttle.
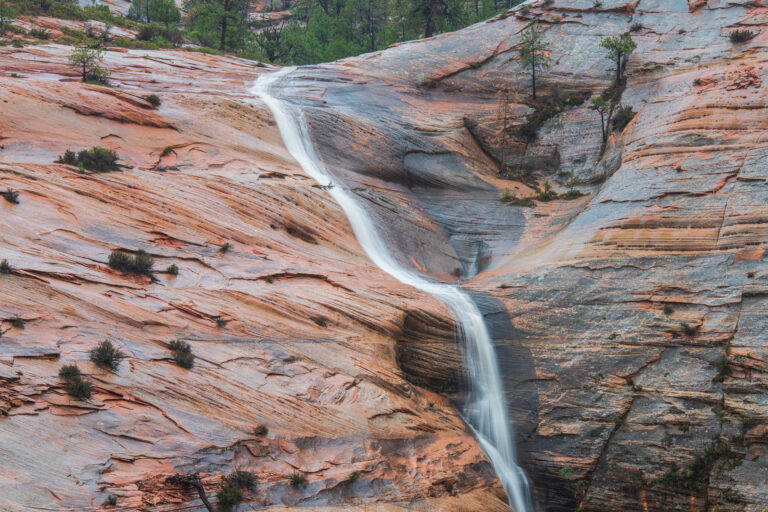
Monsoon season at Zion is late summer through early fall. Be aware of potential flash floods at Zion: sudden increase in the depth and speed of water in rivers, streams, or washes due to heavy rain from thunderstorms. These flood waters carry large debris like tree trunks and boulders.
When it rains at Zion, you’re in for a treat to see the pop-up waterfalls around the park!
Fall Weather at Zion starts to cool down making it a great time to explore the park because it will be cooler in the mornings and evenings, and the daytime temperatures aren’t too hot compared to the summer.
- Zion in September: Highs 70 | Lows 48 degrees F
- Zion in October: Highs 62 | Lows 40 degrees F
- Zion in November: Highs 55 | Lows 30 degrees F
With the cooler temperatures at night, you will definitely want to bring a fleece jacket, warm hat and gloves for the nights and early mornings.
Fall is a nice time to be in the park on a sunny day when the air isn’t stifling! It’s a perfect time to explore the Zion National Park hikes! The fall months are still busy so the shuttle will be in operation. Here’s a list of Zion hikes without the shuttle we recommend!
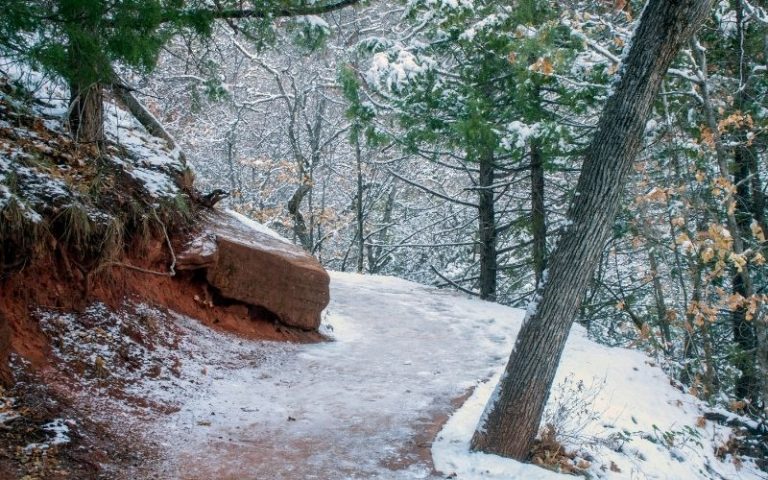
Winter Weather at Zion is when the temperatures really drop. It’s also the least busy season. We don’t mind the colder weather for enjoying outdoor activities, which makes the winter the best time for us to visit to escape the crowds!
BUT the cold winter weather may not be for everyone.
- Zion in December: Highs 48 | Lows 24 degrees F
- Zion in January: Highs 50 | Lows 25 degrees F
- Zion in February: Highs 50 | Lows 25 degrees F
During the winter it is especially important to dress in layers. We recommend an insulated winter jacket, fleece jacket, warm hat and gloves if you’ll be doing any outside activities. Here’s the full list of the outdoor winter clothing we use!
We enjoy Zion National Park photography in the winter – check out these awesome photographer gloves and rechargeable hand warmers we use!

Things to Know Before Visiting Zion National Park
Located in the Southwest of Utah, near the towns of Kanab, St. George, and Cedar City, a trip to Zion national park is a truly amazing experience that is not to be missed by anyone who loves the outdoors.
Zion National Park should be on your bucket list. The landscape includes narrow sandstone canyons, high plateaus with spectacular views, and the Virgin River as it flows through the park. The hiking trails at Zion are world-famous and fun to explore.
You’ll also find a variety of things to do in Zion National Park besides hiking!
Zion Operating Hours and Entry Fees
Zion National Park is open to visitors twenty-four hours day, every day of the year. You will want to check the website because some services and facilities do close or reduce hours during parts of the year.
If you plan on visiting other Utah National Parks, or any other US National Park during the year, we always recommend getting the US National Park pass. (Did you know when you buy the National Parks Pass from REI, they donate 10% to the National Park Foundation?)
Zion Shuttle and Parking
It’s important to know all the rules and regulations for parking at Zion National Park! Visitors can park only in designated parking spaces and should avoid parking along roadways, on vegetation, and in a way that blocks traffic. If a parking lot is full, do not wait for a spot to open up. Instead, move on and look for parking elsewhere. Anyone who fails to park in designated spots will be subject to a fine and may have their vehicle towed.
You can also park in Springdale, just outside the park entrance. Use the free shuttle that takes you to Zion. Be aware though that you must pay for parking in Springdale and that a park entrance pass does not include town parking, and vice versa.
The Zion National Park Shuttle begins operations during the weekends starting mid-February. Around the first part of March, the shuttle runs daily between Zion Canyon and the town of Springdale. While the shuttle is in operation, no vehicles are permitted on the Zion Canyon Scenic Drive. The shuttle also runs during the Christmas holiday so check the website if you’ll be visiting Zion during that time.
Throughout the high season, buses run from the early morning and into the late evening, with departures about every seven minutes. There are two separate shuttle routes that guests can take when visiting Zion National Park. The Zion Canyon Shuttle connects the Zion Canyon Visitor Center to nine different stops along the Zion Canyon Scenic Drive. The Springdale Shuttle has nine stops in the town of Springdale and will take you to the pedestrian entrance near the Zion Canyon Visitor Center.
When the shuttle service is not in use, Zion National Park can still experience overcrowding. When this happens, the Zion Canyon Scenic Drive will close to the public once all parking lots are full. Therefore, be prepared and make alternative arrangements if you’re planning a Zion itinerary between December and February.
Itinerary for Two Days in Zion National Park
The next two days will be spent taking sunrise and sunset photos, exploring the Zion National Park Scenic Drives, and hiking the trails in the park.
When hiking in Zion, your safety depends on your good judgment, adequate preparation, and constant awareness. Your safety is your responsibility.
- Stay on the trail.
- Stay back from cliff edges.
- Observe posted warnings.
- Please watch children.
- Avoid narrow canyons when storms are threatening.
Before you set out on any Zion National Park hikes, be sure you pack the proper gear, plenty of water and healthy snacks.
- Day Hike Checklist
- What to Bring on a Hike
- Photography Gear for Hiking
- Hiking Gear for Kids & Tips for Hiking with Kids
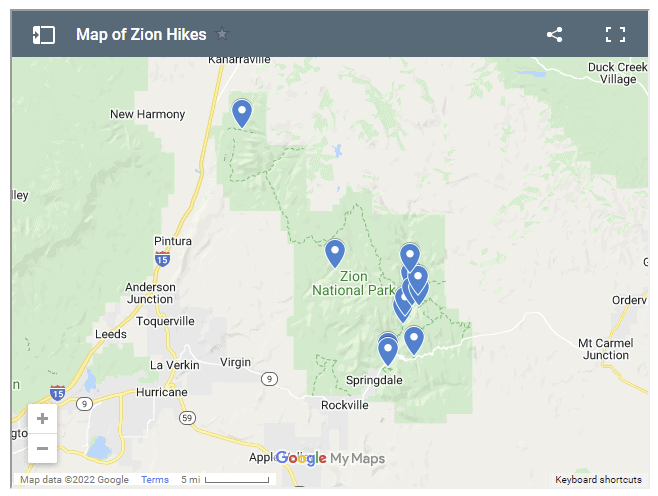
Map of Zion Hikes
Use this Map of Zion Hikes to navigate around the park.
Day 1 at Zion National Park
Here’s what we recommend for visiting Zion the first day of your vacation.
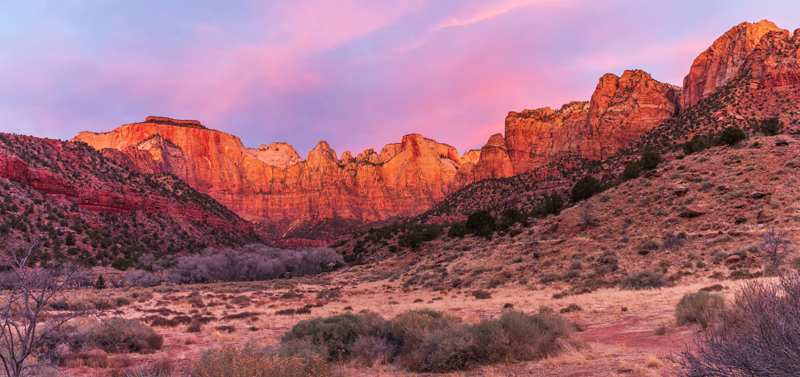
Sunrise at Towers of the Virgin
Photograph the Towers of the Virgin on the patio behind the Zion Human History Museum. This is one of the best photo spots for sunrise at Zion National Park so we recommend going early.
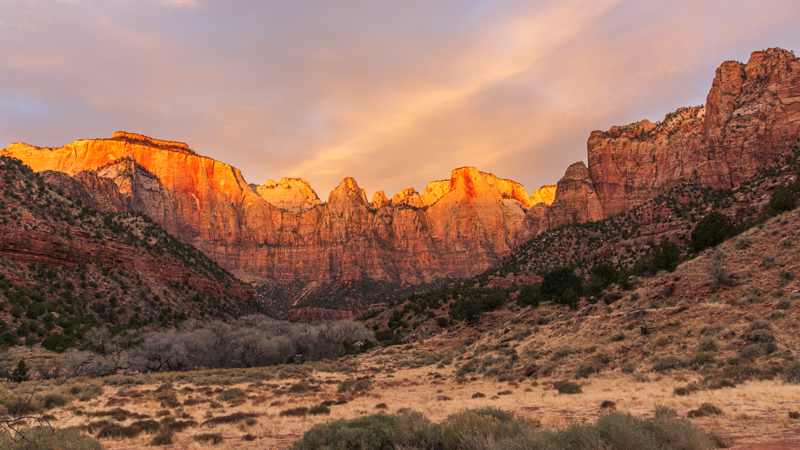
We like to photograph the blue hour light before sunrise, then capture the golden hour light as it shines on the towers.
Zion Canyon Scenic Drive and Hiking Trails
We highly recommend you check the Zion NPS website for the most updated information regarding the US National Parks Reservations required for the time you’ll be visiting. You will need permits to hike one of three trails in the park: Angels Landing, the Subway, and from the Narrows top-down. We’ll detail this more later in the article about hiking these specific trails.
When you’re planning your Zion National Park vacation, you’ll find that the Zion Canyon is the hub of the park. Most of the year, you’ll need to use the Zion National Park Shuttle to access Zion Canyon.
You can also enjoy Zion Canyon by bike. It’s a popular alternative to the shuttle buses. You’ll need to stay on the roadways and ride single file on the right side of the road. Bicycles are allowed on the shuttle buses, but you’ll need to be able to lift them on and off the front racks yourself.
For this Zion two day itinerary, you’ll need to determine the hikes you want to explore based on the time you have available.
Easy Zion Hikes
Easy Zion National Park hikes trails range from 0.4 miles to 3.5 miles and gain no more than 100 feet in elevation. A few are wheelchair accessible with assistance. Since these are shorter hikes, they are the best options for those with a limited amount of time who want to see the amazing landscape of Zion.
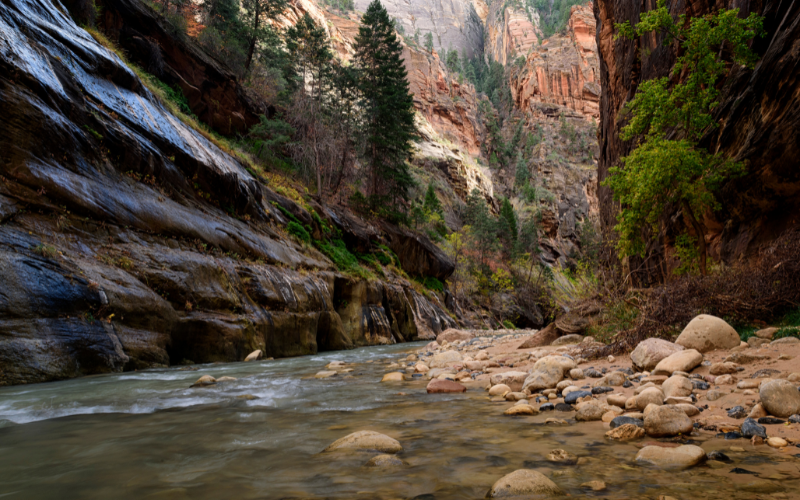
Riverside Walk
- Shuttle Stop: #9 Temple of Sinawava
- Pets: No
- Trailhead Location: Adjacent to bathrooms and water refill station.
- Distance (roundtrip): 2.2 mi
- Elevation Change: 57 ft
- Estimated Hiking Time: 1.5 hours
- Accessible: wheelchairs may need assistance.
The Riverside Walk is a paved Zion National Park trail that follows the Virgin River along the bottom of a narrow canyon. It’s a wonderful place to photograph the river and small waterfalls along the trail.
At the end of the Riverside Walk, the bottom up Narrows trail begins. This is one of the popular trails in Zion national Park so it’s pretty crowded most of the day.
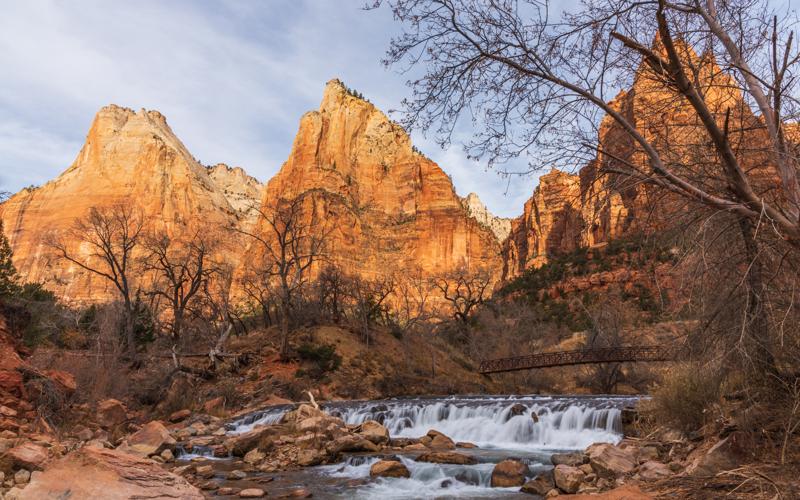
Court of the Patriarchs Hike
- Shuttle Stop: #4 Court of the Patriarchs
- Pets: No
- Trailhead Location: there are trails on both sides of the road
- Estimated Hiking Time:5 to 30 minutes
- Accessible: wheelchairs may need assistance.
The Three Patriarchs area is a terrific Zion National Park photo spot. There are quite a few ways to photograph this area. Walk along the service road toward the buildings and you’ll see a dirt path to the right. Walk along that trail for a short distance until you come to the bridge. This is a great spot to photograph the river, waterfalls, bridge and Three Patriarchs.
There’s also a path that goes along the river. You can find many opportunities to photograph reflections of the Three Patriarchs in the river. As you can see, we enjoy taking photos at Zion National Park in the winter!
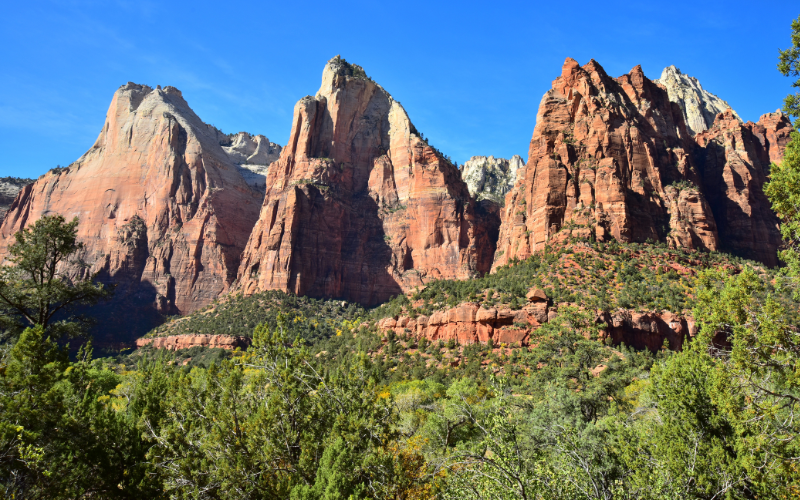
And finally, the view from the short overlook hike on the opposite side of the road from the river provides a different vantage point as well. But it’s best to photograph late afternoon and close to sunset when there’s light on the tops of the patriarchs.
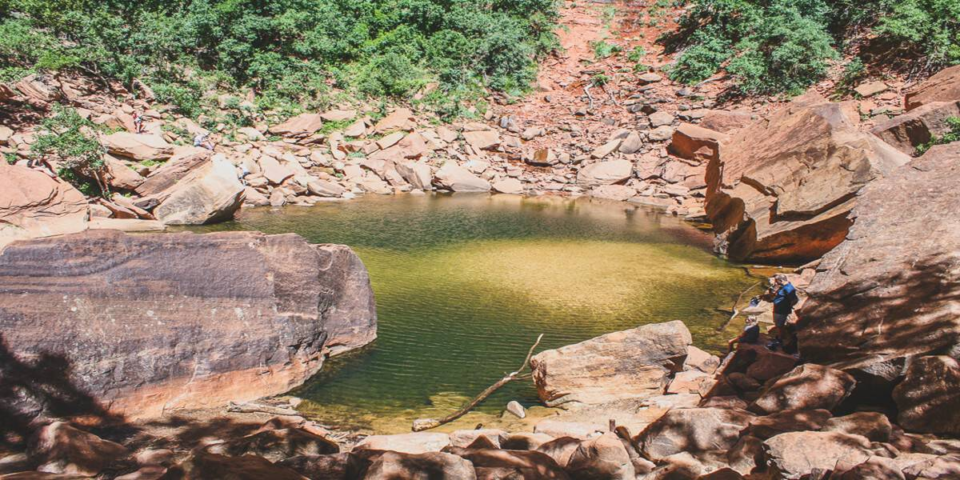
Emerald Pools Trail
- Shuttle Stop: #5 Zion Lodge
- Pets: No
- Trailhead Location: Across the road from the Zion Lodge.
- Distance (roundtrip): 1.2 mi
- Elevation Change: 69 ft
- Estimated Hiking Time: 1 hour
- Services: Bathrooms and water filling stations are available at the Zion Lodge.
This Zion National Park trail is officially listed as two: Lower Emerald Pools and Upper Emerald Pools, but it can easily be done as one leaving from Zion Lodge. This is a nice hike and a good way to fill a couple extra hours. It’s a pretty laid back trail and only has 269 feet of elevation gain between the two trails.
It’s a sandy trail leading to a few small pools of water that are, you guessed it, emerald in color. The upper pool is the coolest, and biggest, so definitely go to that one if you only have time for one.
Moderate Hikes at Zion
The moderate Zion National Park hiking trails range from 1 mile to 7.6 miles and have larger elevation gains. Many of these trails offer magnificent views of Zion Canyon.
This list of moderate hikes requires extra planning:
- wear proper footwear
- carry enough water
- know the physical abilities necessary to successfully complete the hike
Watchman Trail
- Shuttle Stop: #1 Visitor Center
- Pets: No
- Trailhead Location: Up the canyon and across the road. Stay along the river to begin the trail.
- Distance (roundtrip): 3.3 mi
- Elevation Change: 368 ft
- Estimated Hiking Time: 2 hours
- Services: Bathrooms and water filling stations are available at the Visitor Center.
The Watchman trails has moderate drop-offs and ends where you can see the Towers of the Virgin, lower Zion Canyon, Watchman Peak, and Springdale. Read this Watchman trail guide from The Modern Hiker for more details about this hike.
Kayenta Trail
- Shuttle Stop: #6 The Grotto
- Pets: No
- Trailhead Location: Across the street from the shuttle stop and then across the footbridge.
- Distance (roundtrip): 2.0 mi
- Elevation Change: 150 ft
- Estimated Hiking Time: 1.5 hours
- Services: Bathrooms and water filling stations are available at the Grotto.
The Kayenta Trail is an unpaved hike from the Grotto to the Emerald Pools with moderate drop-offs. The Modern Hiker has a good Kayenta trail guide for this hike. Be sure to take photos of the Zion Canyon as you hike along this trail.
Strenuous Hikes at Zion
Strenuous trails require preparation and planning. During the summer you battle extreme heat, thunderstorms, and rain which can bring flash floods. Always check the current weather conditions and plan accordingly. Your safety is your responsibility.
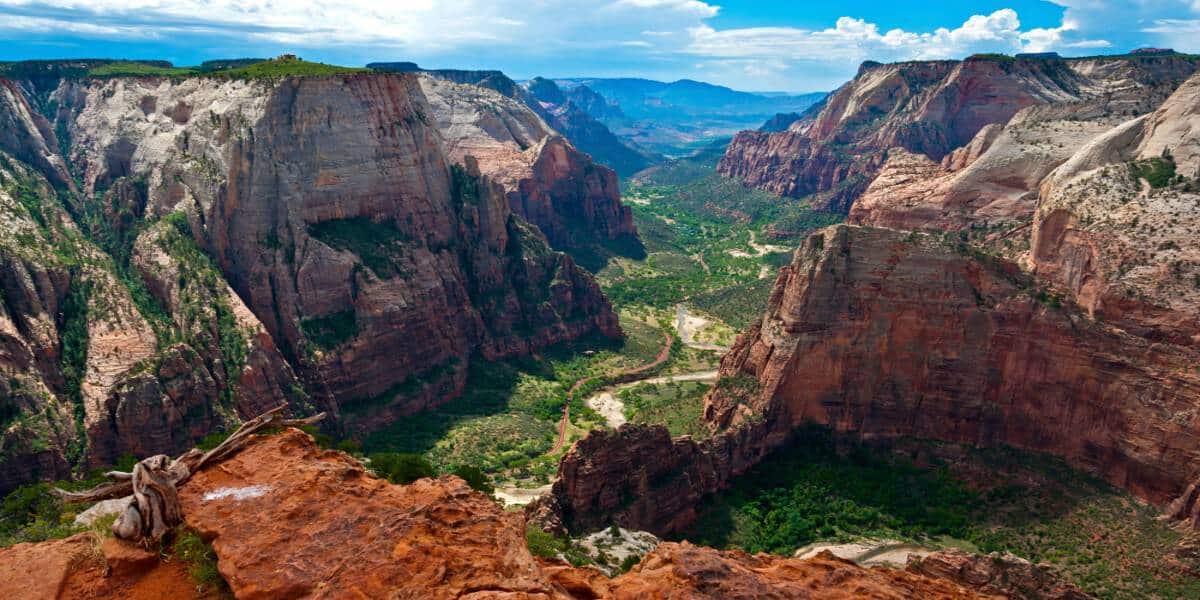
Angel’s Landing
- Shuttle Stop: #6 The Grotto
- Pets: No
- Trailhead Location: Across the road from the shuttle stop and then across the footbridge.
- Distance (roundtrip): 5.4 mi
- Elevation Change: 1,488 ft
- Estimated Hiking Time: 4 hours
- Services: Bathrooms and water filling stations are available at the Zion Lodge.
If there’s one hike everyone knows about in Zion, it’s Angels Landing. One of the best hikes in Zion National Park starts off at The Grotto and follows the Virgin River before climbing the side of the cliff via 21 switchbacks known as Walter’s Wiggles.
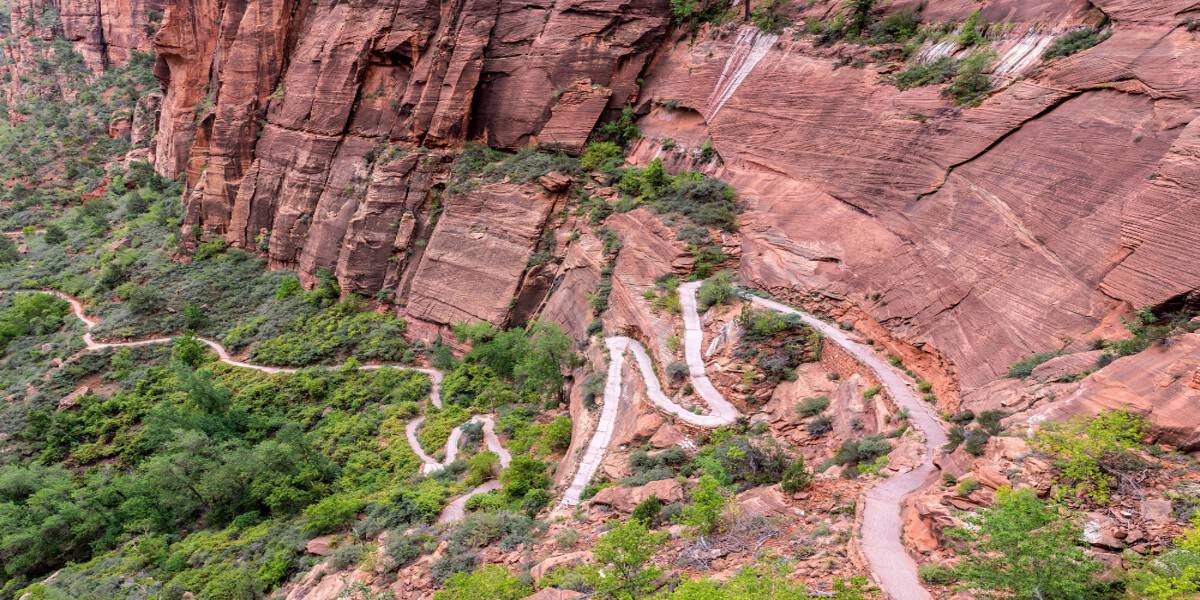
At the top of the switchbacks, you’ll end up at Scout’s Landing, which can be a good stopping point if you have a strong fear of heights. From there to the top, you follow a narrow ridge with steep drop-offs on either side. There is a chain to hold onto on the way up.
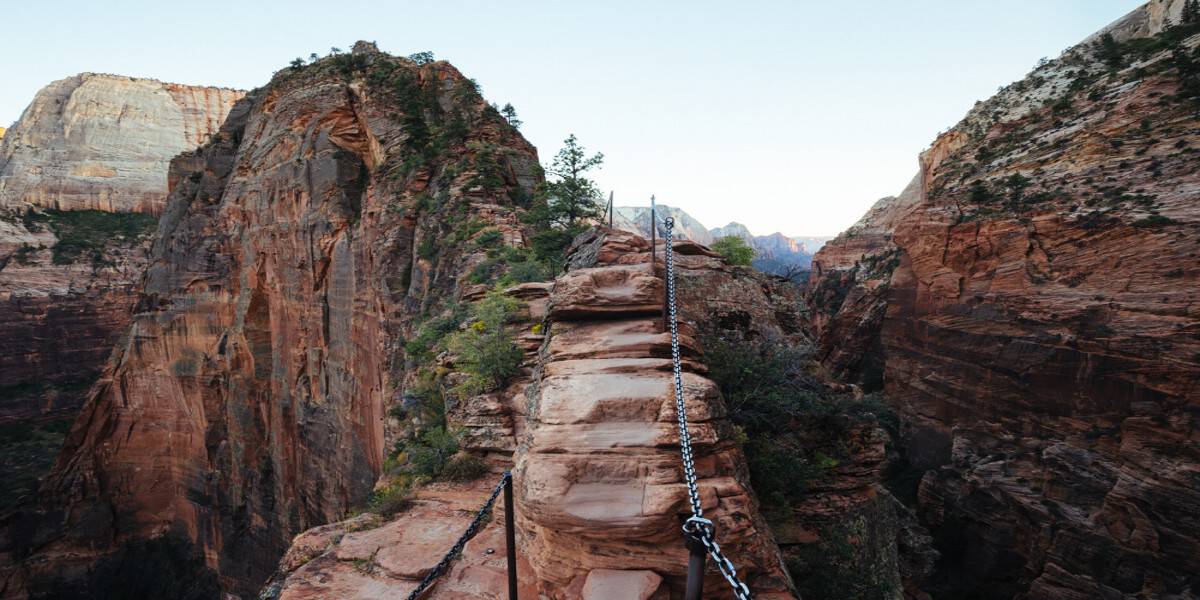
There isn’t much room on the final part of this trail, so if you’re very nervous, have terrible balance, or just hate heights, you may want to reconsider the push to the top. The views are still pretty stellar from Scout’s Landing.
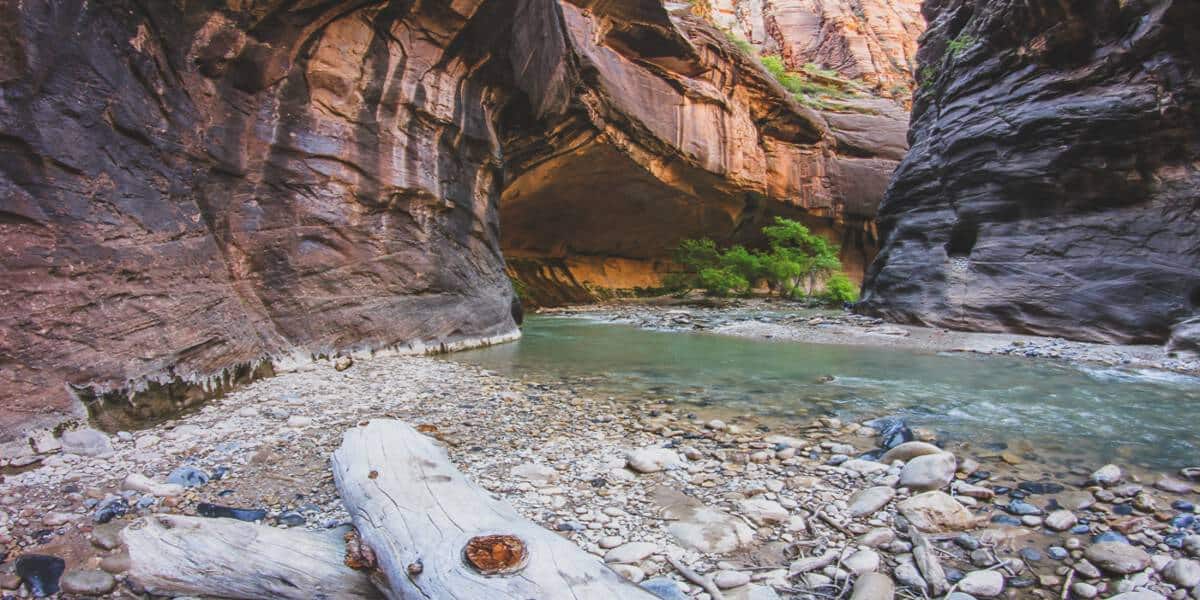
The Narrows
- Shuttle Stop: #9 Temple of Sinawava
- Pets: No
- Trailhead Location: Adjacent to shuttle stop and restrooms.
- Distance (roundtrip): 9.4 mi
- Elevation Change: 334 ft
- Estimated Hiking Time: 8 hours
The Narrows is the other trail everyone knows when you mention Zion National Park hikes. This trail starts at the end of the Riverside Walk and takes you into the Virgin River with canyon walls towering above you on both sides. This trail gets pretty packed during the day in the summer, so we recommend going early in the morning or going in mid-day and heading out in the evening when it empties out.
Most people don’t go the entire 9.4 miles, but only hike in a couple of miles before turning around. This is a one-of-a-kind hike that you should definitely do, at least part of if you have a chance. Important information about the Narrows hike you should know before you hit the trail.
Hidden Canyon
- Shuttle Stop: #7 Weeping Rock
- Pets: No
- Trailhead Location: Access the East Rim Trail from across the footbridge adjacent to the parking lot. The Hidden Canyon Trail turns right from the East Rim Trail at the sign.
- Distance (roundtrip): 2.5 mi
- Elevation Change: 850 ft
- Estimated Hiking Time: 2.5 hours
- Services: Pit toilets are available at the parking area.
The Hidden Canyon trail starts at Weeping Rock, along with Observation Point. You climb the same steep switchbacks before making your way around the outside of the cliff and into the canyon itself. If you’re looking for crazy views, skip this one as it’s more of a cozy canyon that you end up in.
There are some exposed cliffs on one side as you make your way around the cliff, but there are chains most of the way around. The trail can get a little slippery with loose sand on the rock, so be careful of that. Once you get around the cliff, the maintained trail ends, but you can continue a little more.
You have to do a little scrambling over rocks and boulders. None of it is terribly difficult, but remember, it can be harder to get back down, so if you don’t feel comfortable climbing up, don’t force yourself to.
After the first boulder scramble, the canyon almost has the feel of a slot canyon, but is more open. There are some open sandy areas and other areas covered in moss.
About halfway through this Zion National Park trail, there is an arch off to the right marked with a few little cairns. The trail ends shortly after that and you just have to turn back around.
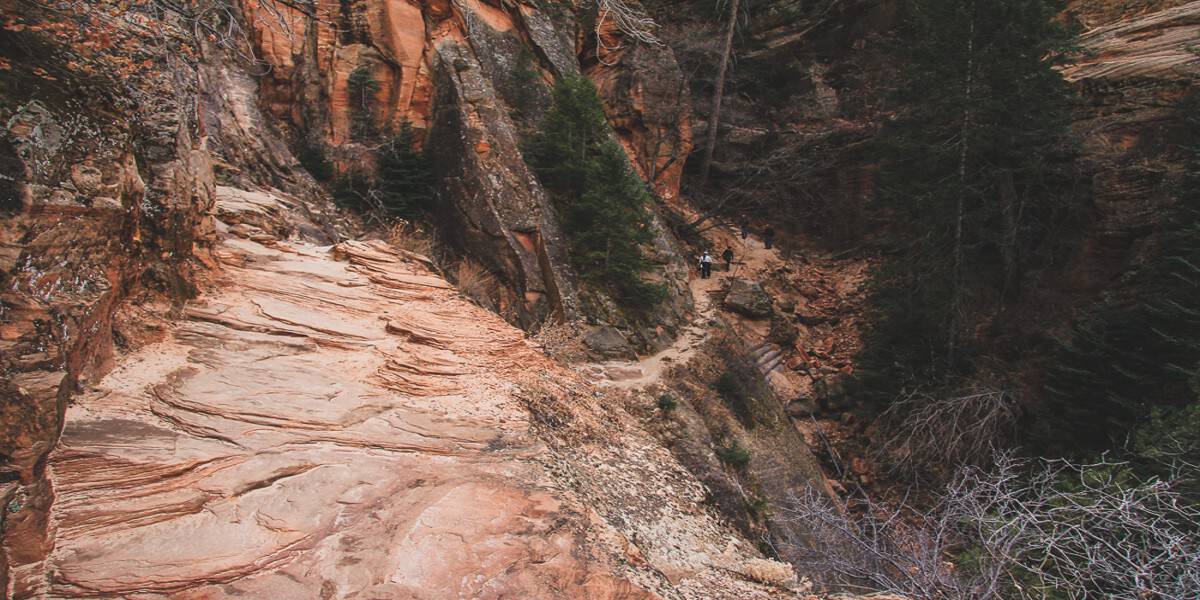
Observation Point
- Shuttle Stop: #7 Weeping Rock
- Pets: No
- Trailhead Location: Access the East Rim Trail from across the footbridge adjacent to the parking lot. The Observation Point Trail branches off of the East Rim Trail after approximately 2.5 miles.
- Distance (roundtrip): 8.0 mi / 12.9 km
- Elevation Change: 2,148 ft / 655 m
- Estimated Hiking Time: 6 hours
- Services: Pit toilets are available at the parking area.
The view at the end of the Observation Point trail rivals the view at Angel’s Landing. It actually overlooks Angel’s Landing.
This Zion National Park trail starts at the Weeping Rock stop and takes you up some steep switchbacks.
The entire trail can be quite tough, but it is paved. If you don’t like heights, but don’t mind a longer hike, this is a good alternative to Angel’s Landing because it doesn’t have the same exposed cliffs.
The last mile on the rim of the canyon is mostly flat, offering relief from the steep climb up. The hike back down is the same way you came from. It can be tough on knees, so take your time getting back down. I would definitely do this one if you have a full day, are in relatively good shape, and like stellar views.
This is also a nice location to photograph the hoodoos with the night sky!
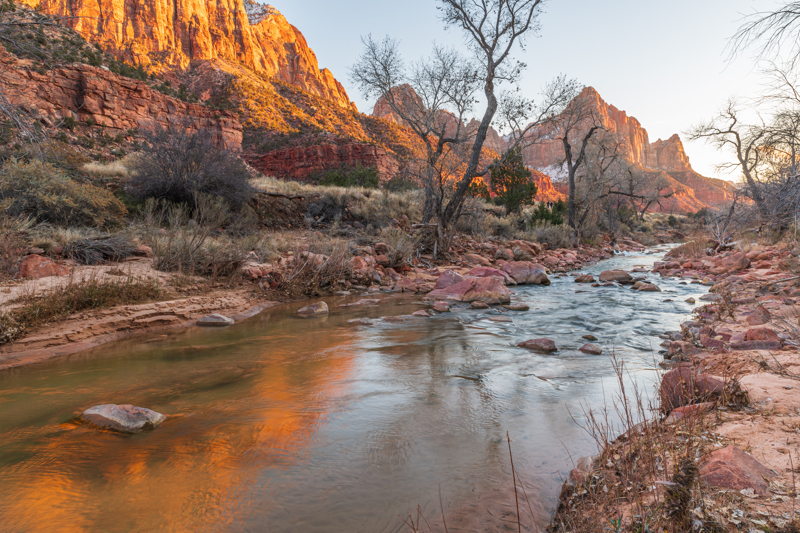
Pa’rus Trail and The Watchman at Sunset
- Shuttle Stop: #1 Visitor Center
- Pets: Yes
- Trailhead Location: Access is up the canyon from the Visitor Center and across the bridge adjacent to the South Campground. This trail can also be accessed from the Canyon Junction shuttle stop.
- Distance (roundtrip): 3.5 mi
- Elevation Change: 50 ft
- Estimated Hiking Time: 2 hours
- Accessible: Wheelchairs may need assistance.
- Services: Bathrooms and water filling stations are available at the Visitor Center.
This is the only trail in Zion National Park that allows both pets (on a leash up to 6 feet) and bicycles.
The BEST and most iconic place for sunset is along the Pa’rus Trail to see The Watchman illuminated by the golden light.
Access the trail near the Visitor Center – watch for the signs. The Pa’rus Trail runs along the Virgin River providing many spots to take photos!
In the late afternoon and around sunset there’s golden light on the Watchman. Capture the golden reflection in the Virgin River for a stunning shot!
You’ll see deer along the trail in the evening so be prepared to photograph wildlife too!
Day 2 at Zion National Park
Here’s what we recommend for visiting Zion the second day of your vacation.
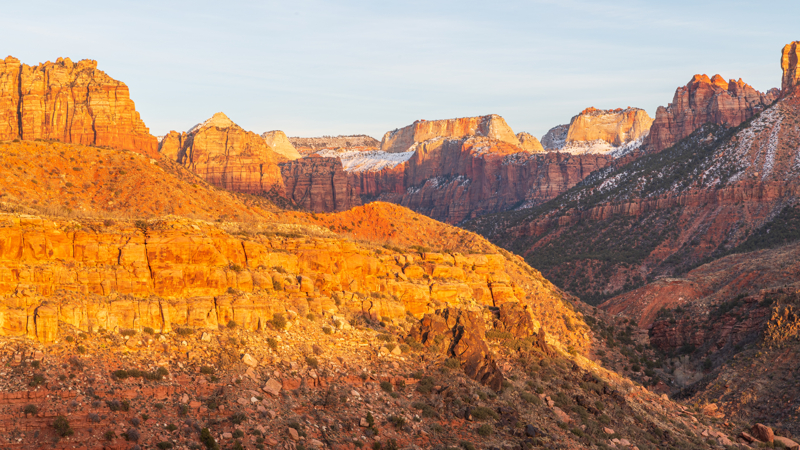
Sunrise at Canyon Overlook Trail
We love photographing sunrise at the end of the Canyon Overlook Trail. It’s a short, easy Zion National Park hike with one of the best views of the main canyon with first light hitting the East Temple just above!
If you get there early enough, you can capture light trails as the cars drive along the switchbacks below.
Start this easy hike an hour before sunrise so you’ll be at the overlook in time to capture the glow on the tops of the mountains across the valley. You’ll need a headlamp for the first part of the hike.
The trailhead is located behind the ranger traffic booth on the north side of the road. There are spots along this 1 mile round-trip trail with steep drop offs. Canyon Overlook is a good location to get a wide angle photo to show the entire canyon! And it works well to capture a vertical orientation image too.

IF you don’t want to do the hike, then we recommend sunrise photography along the switchbacks as you drive Highway 9 from Springdale up to the Mt. Carmel Tunnel. There are pullouts where you can get a terrific view!
Next you’ll explore the other TWO scenic drives at Zion that don’t require using the shuttle!
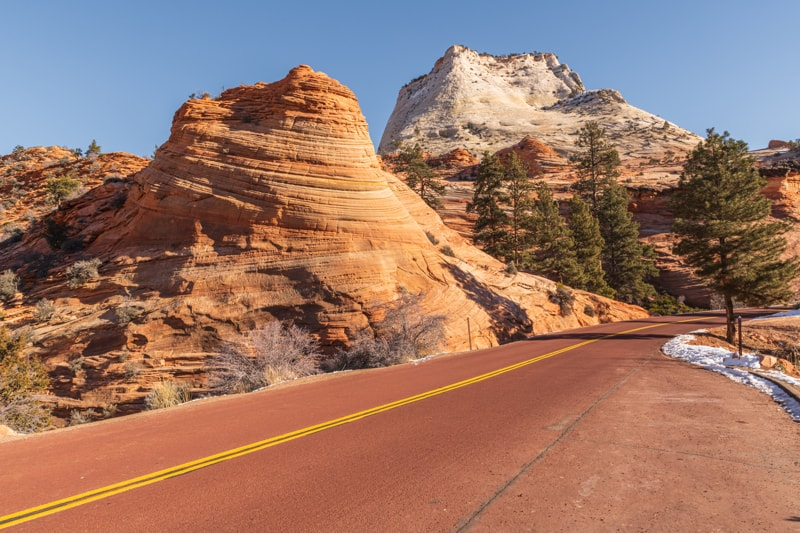
Zion-Mount Carmel Highway
There are a few names for this Zion National Park Scenic Drive from Springdale to the Mt. Carmel Junction past the east entrance to Zion National Park. It’s known as Utah Scenic Byway-9, Zion-Mt. Carmel Highway and Mt. Carmel Scenic Byway. No matter what you call it, it’s definitely a scenic drive!
This section of road through Zion National Park never closes, and you can drive your personal vehicle. There’s no shuttle bus along this route.
Note that large campers, RVs and buses must have an escort and requires a Zion-Mount Carmel tunnel permit.
Along the 10 mile scenic drive you’ll encounter two tunnels, switchbacks, slickrock and fantastic views. There are numerous spots where you can pull off the road to take pictures or enjoy a short hike.
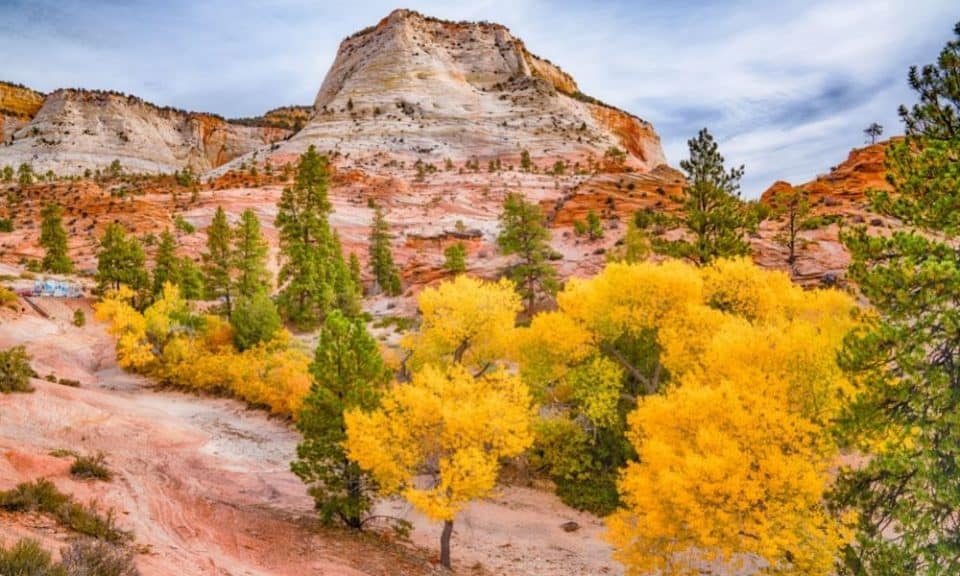
This stretch of road is a terrific place to enjoy the autumn colors at Zion National Park in the fall.
It’s amazing driving through the tunnels carved into the deep stone mountains. They are lit within by windows cut through to the face of the cliffs.
There are no pull-off points, and no walking or biking is allowed within the tunnels, so you’re left to see the views through the “windows” as you drive.
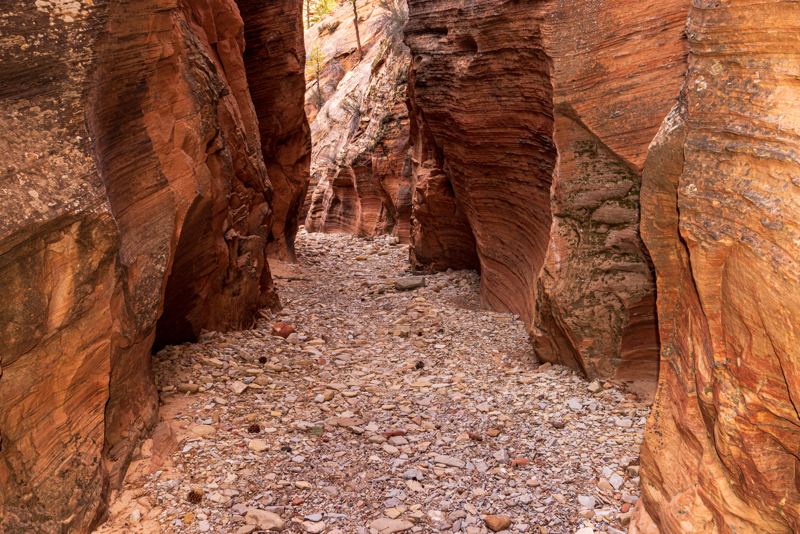
You’ll find many other unofficial hiking trails all along this highway. Just find a good spot to park at a pullout and head off! There are mini slot canyons that follow along the river bed.
We recommend you stop at the various pullouts as you drive so you can photograph the stunning landscape here that’s a bit different from what you see in Zion Canyon.
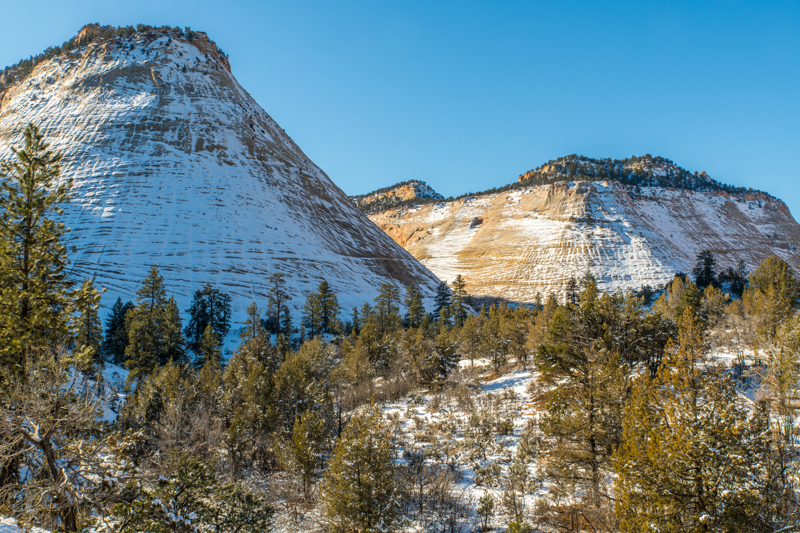
Be sure to pull into the Checkerboard Mesa parking lot to see the unique rock formation with checkerboard patterned lines.
At this point, you’ll turn around and head back to Springdale. If you kept driving past Checkerboard Mesa, you’d reach the East entrance to Zion National Park.
Kolob Terrace Scenic Drive
The Kolob Terrace Scenic Drive is another beautiful area that starts near the town of Virgin. Because it’s a bit away from Zion Canyon and Mt. Carmel, it’s not as crowded.
Kolob Terrace is a high plateau area towering above an open desert with amazing views of the colorful rocks famous at Zion.
Most of the trailheads here lead into the Zion wilderness. Exploring the backcountry and canyoneering are popular things to do at Zion National Park.
The road is open all year, but if you’re visiting Zion National Park in the winter, be prepared for unpredictable weather in this area. Access to the upper part of the Kolob Terrace Road, including Lava Point, closes in the winter. Driving conditions can be very poor during a storm, but roads are usually plowed quickly after.

Kolob Terrace Road at Sunset
Kolob Terrace Road is amazing in the late afternoon and around sunset. Access this road near the town of Virgin, just west of Springdale.
Park at the Left Fork trail and walk a short distance to see this amazing view! The reflected sun on the landscape is just stunning!
Keep driving along the road until you get to the Hop Valley Trailhead. You’ll find stunning views of the valley from the ridge that lights up at sunset.
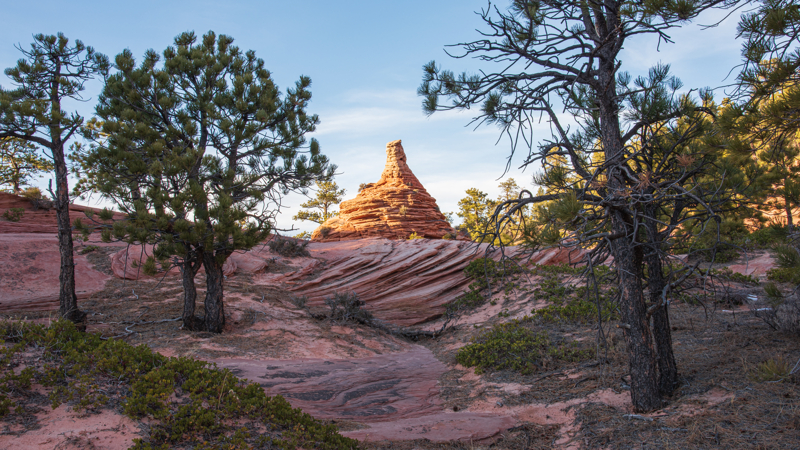
“Hoodoo City” is a favorite photo spot at Zion for us. It’s just east of the Hop Valley Trailhead. You can hike from the trailhead, or park at a pull-off about ½ mile to the east. Hike along the shelf above the valley until you find a spot to access the hoodoo formations below.
There is SO MUCH to do at Zion National Park, and with only two days, you won’t get to do it all!
Determine the top activities from the list above then create your itinerary.
Things To Do Near Zion National Park
You’ll find even more things to do in the area, especially if you’ll be driving from Zion National Park to Bryce Canyon:
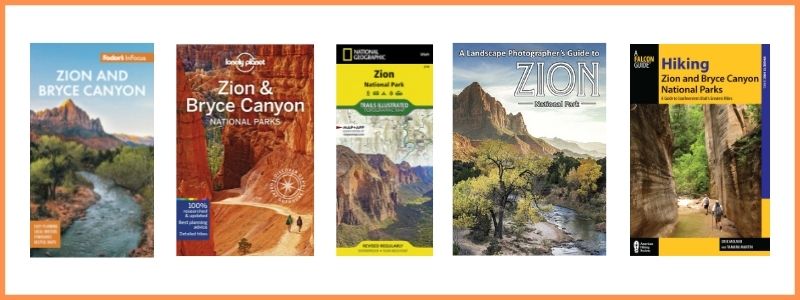
BUY ZION GUIDES & MAPS AT AMAZON
Zion National Park Packing List
Use our Zion National Park Packing List to make sure you have the right clothing and gear for visiting any time of year! Grab your free printable packing checklist by clicking the image below!