Easy Hikes at Arches National Park
Arches National Park is located in Southeast Utah and is known for its red-rock canyons and towering sandstone formations. Here’s a list of easy hikes at Arches National Park to explore this scenic park!
This Arches National Park travel guide will detail the best easy hiking trails, recommended hiking gear, and tips for visiting the park.
We live a few hours away from Arches so we get to visit often, and know what it’s like to hike during all four seasons. Due to the desert environment here, it’s important to stay hydrated, use sun protection, and get the latest weather information before hitting the trails any time of year.
The tips we share here are based on our experience hiking at Arches National Park throughout the years!
We’ve made it easy for you to plan your Arches National Park vacation with these done-for-you itineraries based on the time you have to spend at the park:
- Arches National Park in One Day
- Two Days in Arches National Park
- Three Days in Arches National Park
- Arches National Park and Canyonlands in One Day

This site contains affiliate links which means WE may receive commissions for purchases made through these links. We only provide links to products we actually use and/or wholeheartedly recommend! As an Amazon Associate, we earn from qualifying purchases. Read the full Disclosure Policy.
A Photo Tour of Arches National Park
Take a visual tour through Arches National Park to see the stunning landscapes you’ll see when you visit!
Tips for Hiking at Arches National Park
Arches Timed Entry Ticket: From April 1 to October 31 you’ll need an Arches Timed Entry ticket to enter the park from 6 a.m. to 5 p.m. daily. If can can’t get a ticket, you can still visit the park by going in before 6 a.m. or after 5 p.m. Those are the best times to enjoy sunrise at Arches and avoid the crowds anyway!
Arches Weather: When planning your vacation be sure you know what Arches National Park weather to expect during the time of your visit. Spring and Fall you’ll enjoy the most moderate temperatures and weather. Summer will be HOT with highs near 100 degrees F. Winter is our favorite time of year to visit, but you’ll need to be prepared for cold weather and the possibility of snow storms.
Arches Hiking Gear: One of the best Arches National Park activities is hiking. It’s important to be prepared with the right clothing and gear for hiking at Arches!
- Wicking clothing: Loose-fitting, light-colored, wicking clothing for spring, summer, and fall.
- Sunhat: Sun protection year round.
- Fleece jacket: Layers are key during the spring/fall.
- Insulated jacket: You’ll want a heavier jacket, hat, and gloves during the winter.
- Darn Tough hiking socks: Do not wear cotton socks. Darn Tough Socks are comfortable, breathe well, and prevent blisters!
- Sturdy hiking shoes: Hiking shoes or boots should be sturdy with good tread and traction. Use waterproof shoes in the winter.
- Water: Carry and drink at least two liters of water. Use refillable water bottles or hydration packs. You can get water at the Visitor Center and Devil’s Garden Trailhead. We carry Propel powder packets to add to our water to help replace electrolytes.
- Sunscreen: Apply sunscreen to all exposed skin! Due to the dry heat, you’ll also want lip balm and lotion!
- Snacks: Pack salty and easy to digest snacks to replace electrolytes.

Easy Hikes at Arches National Park
Some of the best hikes in Arches National Park are rated easy for everyone to see the incredible landscapes at this park!
There is not much shade at Arches National Park, so it’s best to hit the trails in the early morning or later in the day when the temperatures aren’t as hot, and the sun isn’t as intense!
We’ve ordered the list of easy hikes below based on location along the Arches Scenic Drive heading into the park from the Visitor Center.
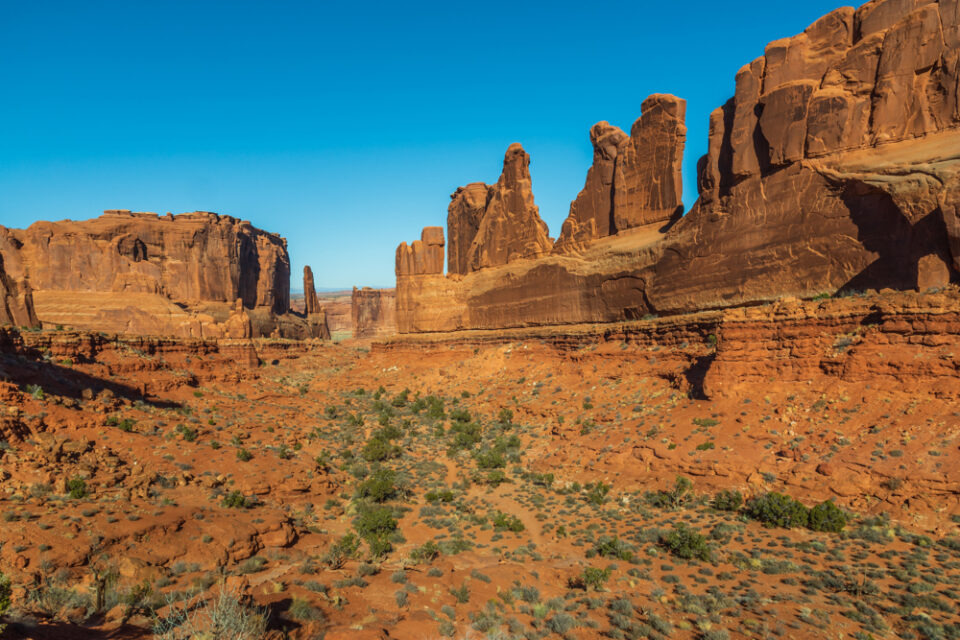
Park Avenue Hike
- Trailhead & Parking Area: Park Avenue Trailhead
- Distance: 2 mile roundtrip
- Elevation Gain: 187 feet
- Difficulty Level: Easy
Park Avenue is the first parking lot on the left as you drive along the Arches National Park scenic drive from the Visitor Center. The trail follows the bottom of a canyon below some of the park’s gigantic and well-known monoliths.
From the Park Avenue parking lot there are some rock steps to navigate down to the main trail along the canyon.
The Park Avenue Trail is a one-way trail if you have two cars or a shuttle vehicle. The trail is a little over one mile taking you from the Park Avenue trailhead to the Courthouse Towers parking lot. This is where you would leave your second vehicle or have someone that doesn’t want to hike pick you up.
If that’s not an option, just head back the way you came through the towering sandstone for a nice 2 mile round-trip adventure.
The latter part of the hiking trail has good views of the famous Arches landmarks: The Organ, Tower of Babel and the Three Gossips.
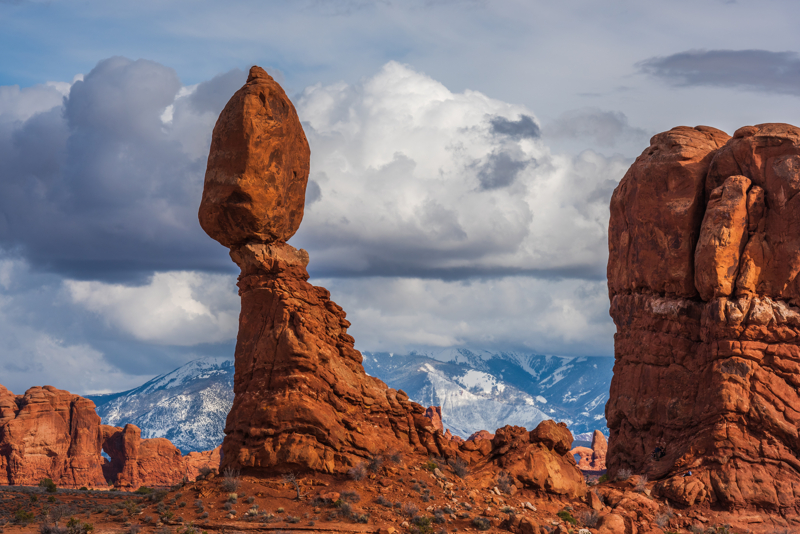
Balanced Rock Hike
- Trailhead & Parking Area: Balanced Rock Trailhead
- Distance: 0.3 mile roundtrip
- Elevation Gain: 45 feet
- Difficulty Level: Easy
As you continue along the scenic drive, you’ll come to Balanced Rock on the right side of the road.
Yes, you can see the rock from the parking lot, but we think it’s worth the time to walk along the trail around the base of Balanced Rock. Take note how the stone structure looks different as you walk around it.
It’s an easy, short loop hike that takes you close to and around the Balanced Rock. There is one section with a few rock steps to make the full loop, but you can just as easily stay on the paved portions of the trail and not make the full loop.
Balanced Rock is a terrific spot for watching and photographing the sunset at Arches National Park!
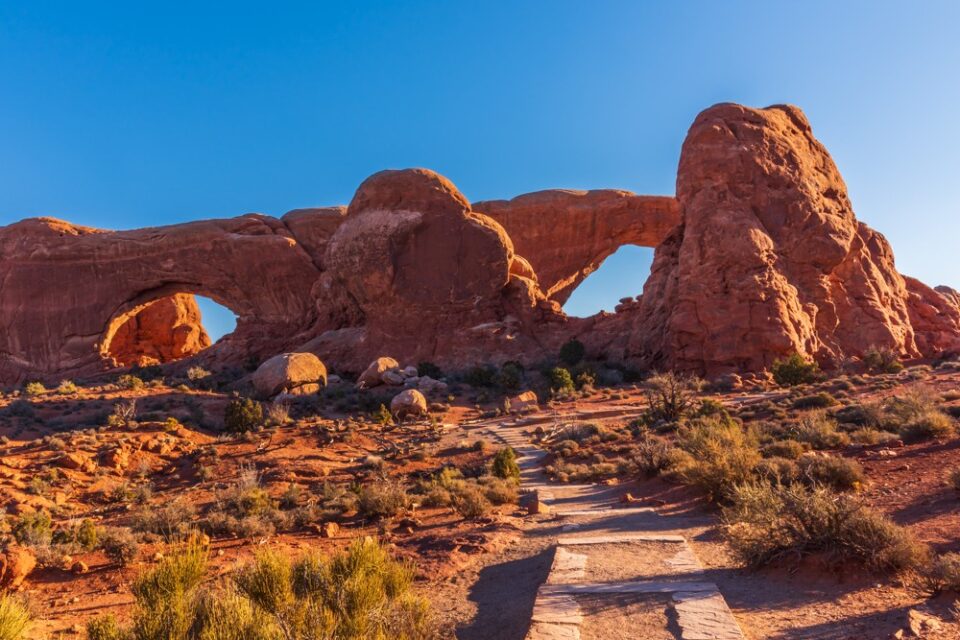
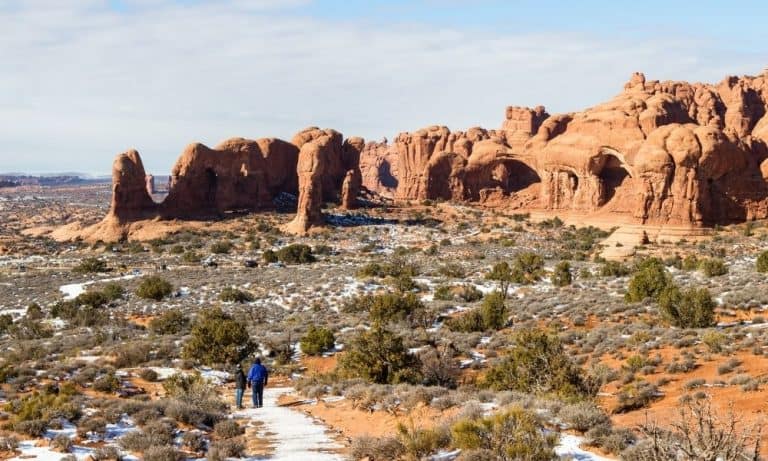
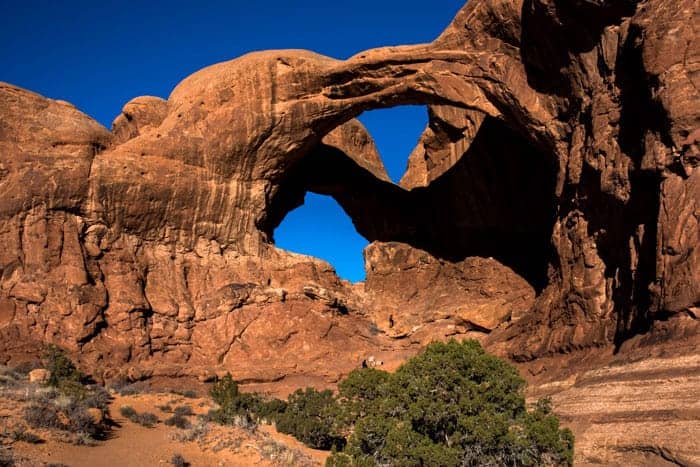
The Windows Section Hikes
- Trailhead & Parking Area: The Windows Trailhead
- Distance: 1 mile roundtrip
- Elevation Gain: 187 feet
- Difficulty Level: Easy
The Windows Section of Arches National Park is a cool area with a lot to see. The Windows Trail loop is under 2 miles. The trail includes a few areas with rock steps in order to complete the full loop.
You’ll see these two features along the loop hike: North and South Windows and Turret Arch. From the viewpoint of South Window, there’s a primitive loop trail to see the back side of North and South Window. This trail ends at the parking lot about 50 yards north of the main trailhead.
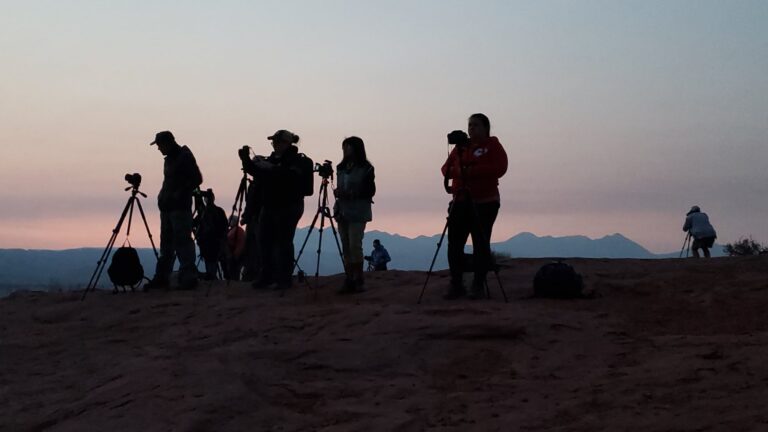
This is also a terrific area for stargazing or taking Milky Way photos to enjoy the amazing star-filled nights at Arches!
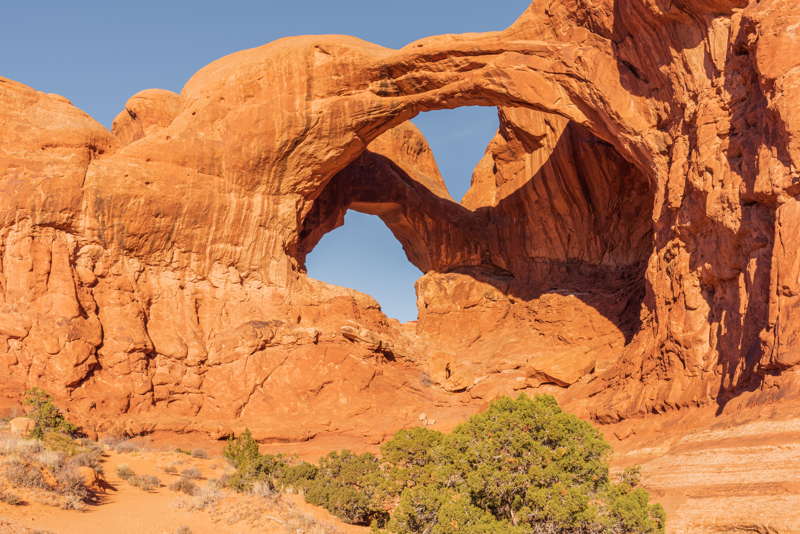
Double Arch Hike
- Trailhead & Parking Area: Double Arch Trailhead
- Distance: 0.5 mile roundtrip
- Elevation Gain: 32 feet
- Difficulty Level: Easy
On the other side of the Windows parking area is the Double Arch trail. Double Arch features two giant arches right next to each other!
It’s easy and super short. You can see it from the parking lot, but you’ll definitely want to get up close to this one.

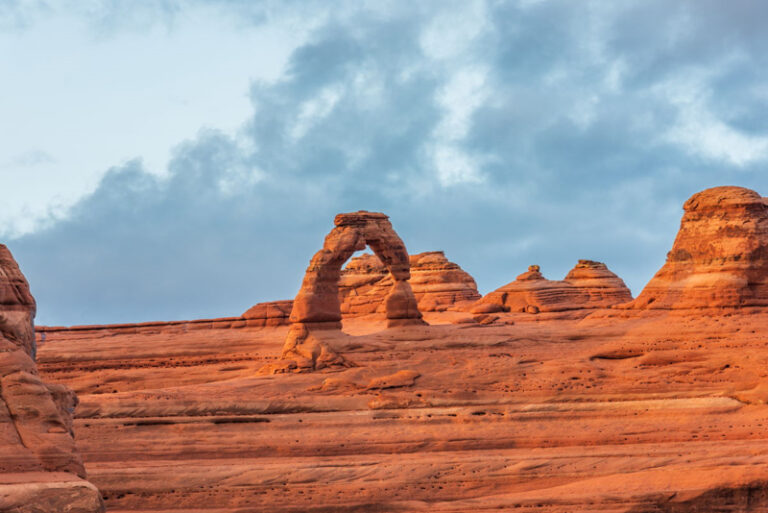
Lower Delicate Arch Viewpoint Hike
Delicate Arch is a must-see when visiting Arches! But the Delicate Arch hike to the arch itself is moderate to difficult.
Luckily you can still see the arch from the Lower Delicate Arch Viewpoint. The viewpoint is about 100 yards from the lower viewpoint parking lot where you can see the arch about a mile away.
You can access the Upper Viewpoint Trail from this same location. It’s a short .5 mile hike with a few stairs to climb that will get you a little closer to the arch.
You can’t get all the way to Delicate Arch from here. But it does provide a slightly less obstructed view from what you see at the Lower Viewpoint.
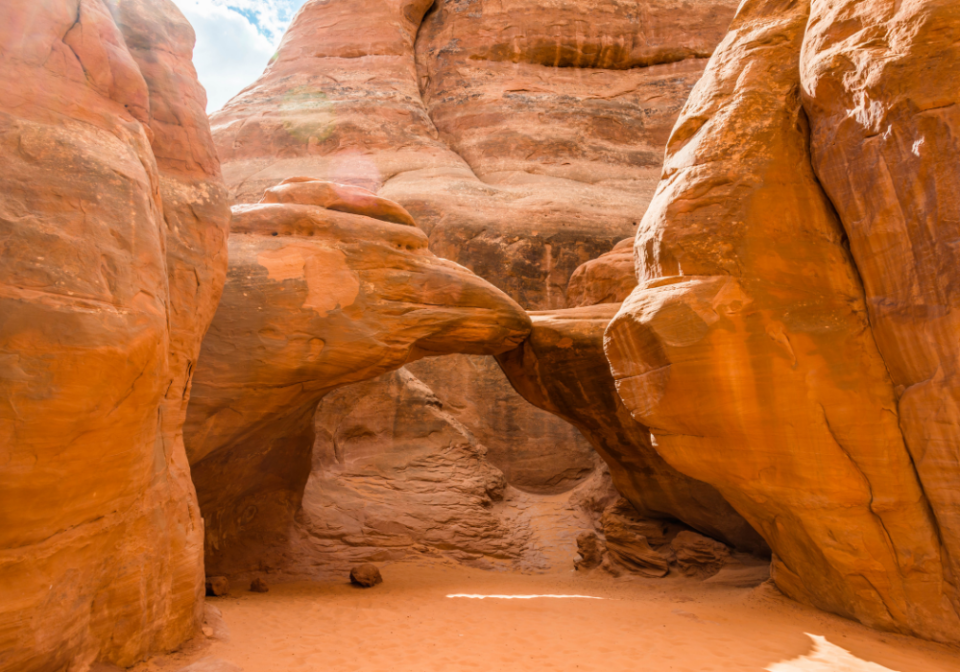
Sand Dune Arch and Broken Arch Hikes
- Trailhead & Parking Area: Sand Dune Arch
- Distance: 2 miles roundtrip
- Elevation Gain: 226 feet
- Difficulty Level: Easy
The Sand Dune Arch trail is a spur off the Broken Arch trail. It’s a fun and unique hike because the arch is located in an ‘almost’ slot canyon.
If you’re visiting Arches National Park with kids, Sand Dune Arch sits in the shade for most of the day so it’s a great hike to take a break and let the kids play in the cool sand!

The Broken Arch trail continues past the Sand Dune Trail. This trail often gets bypassed, but it’s an easy, flat hike and you won’t encounter many people on it.
After reaching Broken Arch, it’s a difficult scramble up a slickrock section to continue through the arch. You can also hike to Tapestry Arch and the Devil’s Garden campground from here.
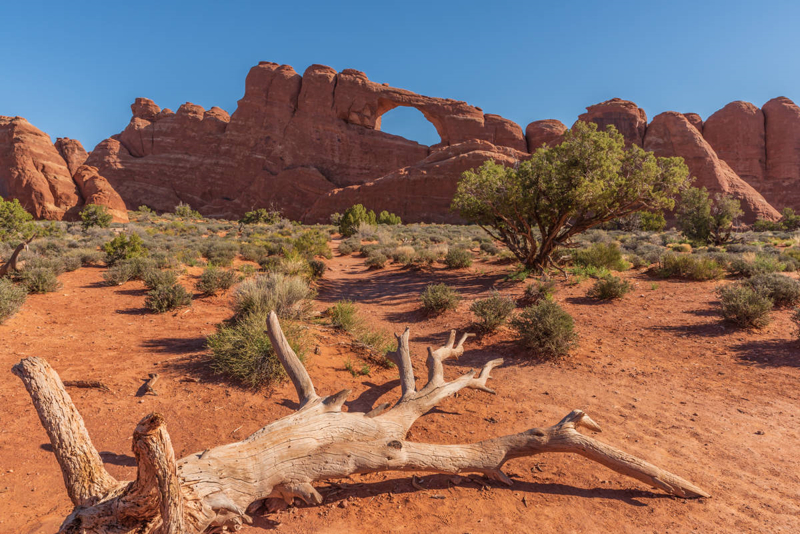
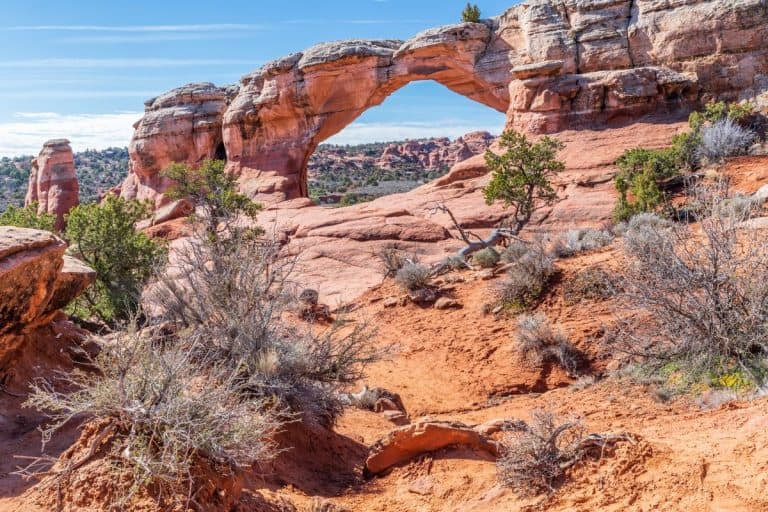
Skyline Arch Hike
- Trailhead & Parking Area: Skyline Arch
- Distance: 0.4 mile roundtrip
- Elevation Gain: 28 feet
- Difficulty Level: Easy
Skyline Arch sits high atop rocks in the Devils Garden area and can be seen from the scenic drive. Most people stop at the pullout, take a picture, then drive on.
We recommend the short hike to get a good view of the arch! You can also drive to the Devil’s Campground amphitheater and take the paved path to see Skyline Arch from the other side.
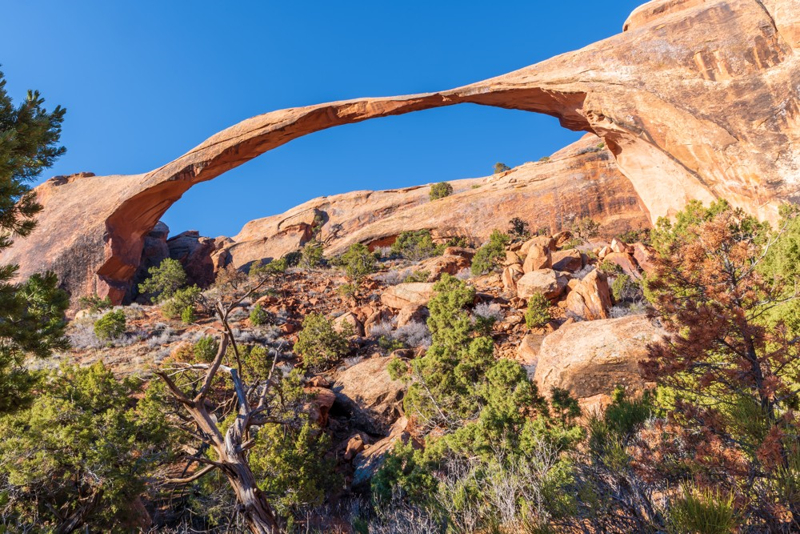
Landscape Arch Hike
- Trailhead & Parking Area: Devil’s Garden Trailhead
- Distance: 1.9 miles roundtrip
- Elevation Gain: 40 feet
- Difficulty Level: Easy
Landscape Arch is the longest arch in North America at 306 feet! It’s a popular point of interest along the Devil’s Garden Trail. Many people will hike to the arch and back.
We recommend you also take the two short and easy spur trails near the beginning of the hike to visit Tunnel Arch and Pine Tree Arch.
From this point, the moderate to difficult Devil’s Garden Trail begins where you’ll see arches, spires, and fins (narrow rock walls).

BUY AT AMAZON: Arches and Canyonlands Guides and Maps
Hikes Near Arches National Park
Places to Stay at Arches National Park
- Arches National Park Lodging
- Arches National Park Camping
- Hotels near Arches National Park
- Glamping Near Arches National Park
- RV Parks Near Arches National Park
Arches National Park Packing List
Use our Arches National Park Packing List to make sure you have the right clothing and gear for visiting any time of year! Grab your free printable packing checklist by clicking the image below!