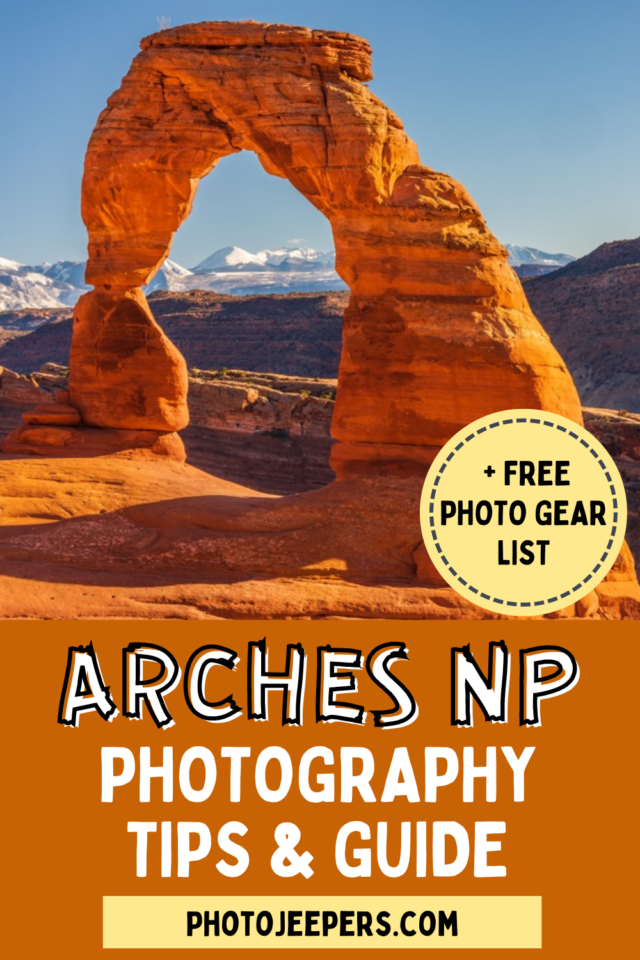
An Expert’s Guide to Arches National Park Photography
One advantage to being a local is knowing all about Arches National Park photography during every season and all types of weather and light conditions.
Use this Arches National Park travel guide with photo tips, a list of best photo spots, and the camera gear you’ll need to take pictures at Arches!
We live close to the park so we’re able to visit Arches National Park often and know the best times of day to take photos at each location.
Here’s our list of photo spots and photo tips to capture the best Arches National Park photography!

This site contains affiliate links which means WE may receive commissions for purchases made through these links. We only provide links to products we actually use and/or wholeheartedly recommend! As an Amazon Associate, we earn from qualifying purchases. Read the full Disclosure Policy.
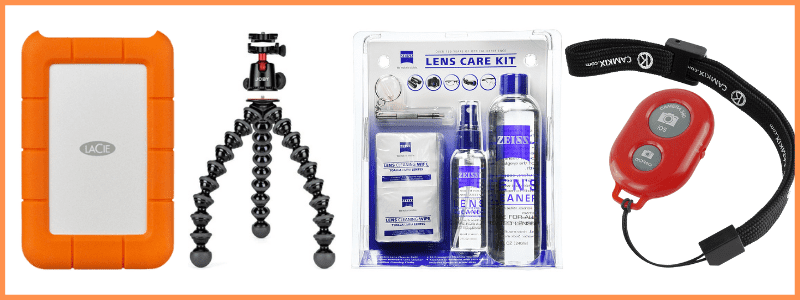
Camera Gear for Arches National Park Photography
We have a printed Camera Gear Checklist to help us pack all the equipment we need – that way we don’t forget anything!
- Cameras for Landscape Photography
- Lightweight Travel Tripods
- Camera Backpack: Protecting your camera from the sand and dust in Arches is essential. Using a camera backpack is so nice for hiking too.
- Graduated neutral density filter: There can be extreme differences in light around the various rock structures. To compensate for this variance of light you’ll need to use a GND filter.
- Camera cleaning kit: You’ll want to remove dust that WILL get on your lens – this is NOT for cleaning the sensor.
- Memory cards
- External hard drive: Don’t forget to copy the photos to a portable external hard drive ‘just in case’.
- Headlamp with a red light: For the best sunrise, sunset or night sky shots, you’ll be navigating in the dark. Use a headlamp to light your way from the parking lot to your spot. Wearing a headlamp allows you to set up your equipment without having to hold a flashlight. Remember to use the red light setting and keep the beam pointed on the ground in front of you to avoid disrupting other photographers in the area taking long exposure shots.
Camera Gear at B&H Photo
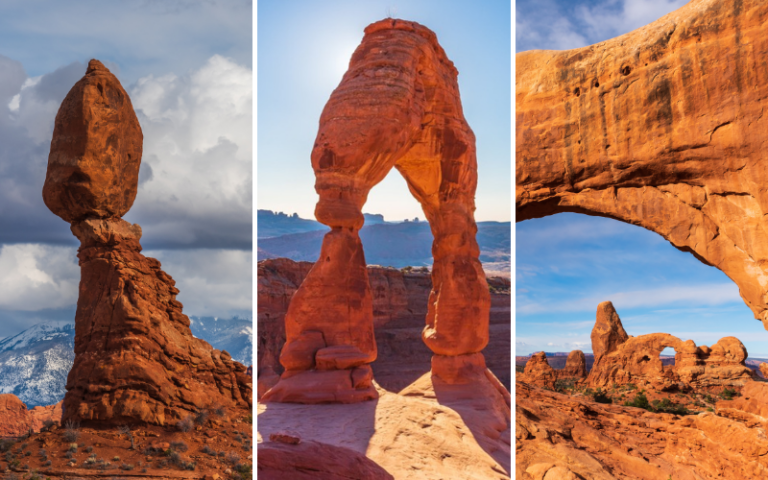
A Photo Tour of Arches National Park
Take a visual tour through Arches National Park to see the stunning landscapes you’ll see when you visit!
Arches National Park Travel Tips
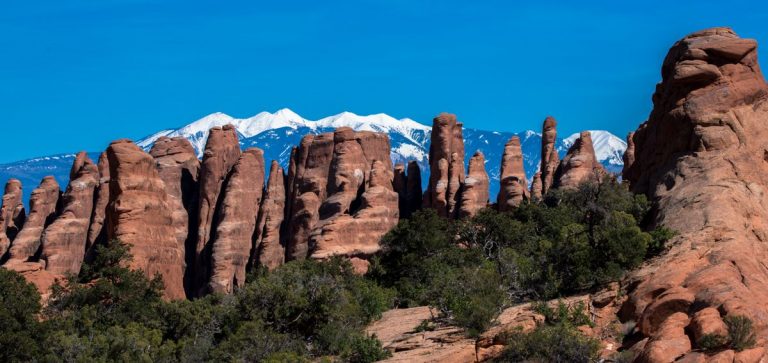
Arches National Park is a few miles north of Moab, Utah. The park has over 2,000 natural stone arches, hundreds of stone pinnacles rising into the sky, immense rock fins and large balanced rocks.
There are a variety of things to do at Arches National Park. Many visitors enjoy the scenery of red rock formations and arches from the car.
Others enjoy the Arches National Park hiking trails. Those who want a bit of quiet away from the crowds will hike the longer and more primitive trails.
Use our Arches National Park travel guide to plan your trip.
Arches Travel Tip #1 – When to Arrive at Arches
Enjoy the park and hiking trails in the cooler temperatures of morning or late afternoon and evening. The golden light at sunrise and sunset are amazing reflected on the red rocks! Arches National Park is one of Moab’s many stargazing spots.
Stay updated on Arches National Park TIMED ENTRY program.
Timed entry tickets will be required to enter the park from 6 a.m. to 5 p.m. daily and will allow visitors to enter the park during a one-hour specified window of availability. After entering, visitors may stay in the park as long as they wish for the remainder of the day. Reservation holders may exit and re-enter the park on the same day with a correctly validated ticket.
Visitors can book reservations first-come, first-served on Recreation.gov. The park will release reservations three months in advance in monthly blocks.
If you don’t have a timed entry ticket, plan to get into the park before 6 am or after 5pm. If you’re serious about getting the best photos, you’ll want to get in the park early for sunrise at Arches National Park, or later in the day for sunset anyway so it works out ok if you can’t get a ticket.
Arches Travel Tip #2 – Be Careful Where You Step at Arches
We like to ‘step off the sidewalk’ to find creative compositions when doing Arches National Park photography or Moab photography in general. And while Arches National Park is beautiful, it’s also very fragile.
If you step off the trail or away from the pullout, you may damage delicate habitat. When biological soil crust is damaged, it can take centuries to recover. Avoid the soil crust and only walk on slickrock or dirt as you explore.
Arches Travel Tip #3 – Use Your National Parks Pass
Don’t forget to purchase the US National Parks Pass – it’s a good deal when visiting multiple parks!
Arches National Park Photography
The unique landscape of arches and slickrock formations makes photographing Arches National Park so fun.
- Sunrise at Arches National Park
- Sunset at Arches National Park
- Arches National Park Photo Spots
- Arches National Park Pictures
If you’re serious about taking the best Arches National Park photos…..
→ CHECK OUT our Arches & Canyonlands Itinerary and Photography Guide
Here’s a list of the best places to photograph Arches National Park.
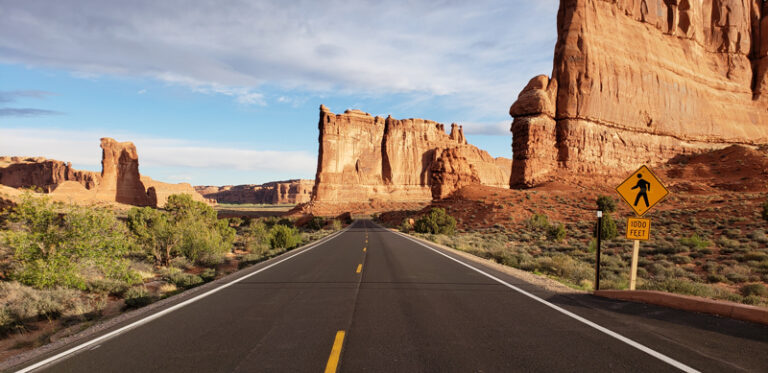
1 – Arches Scenic Drive
The Arches National Park scenic drive offers many landscape scenes to photograph at Arches. The full 43-mile scenic drive, including the spur roads, takes 2 to 3 hours. Add more time if you plan to do any serious Moab, Utah photography or hiking.
The road is paved and offers Arches National Park photo spots from the pullouts along the road or in the parking lots. Some of the arches and landmarks can be reached by a short walk from the parking lot.
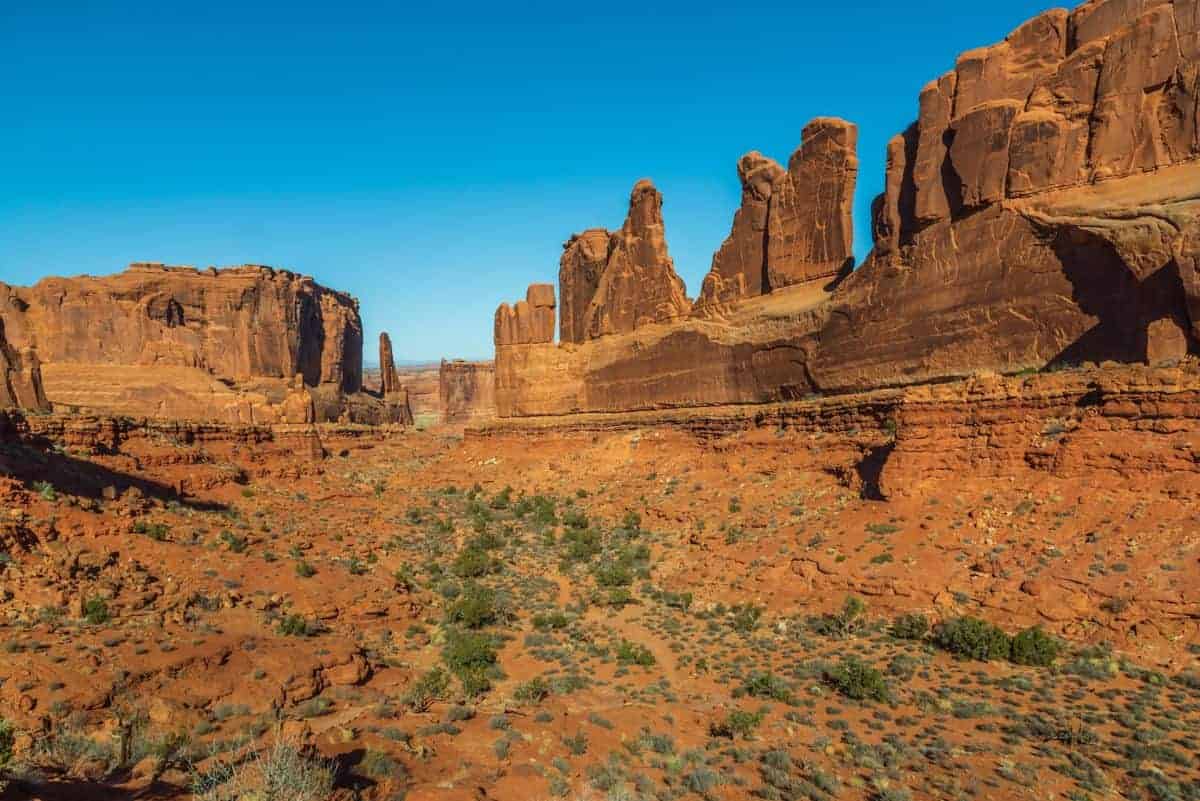
2 – Park Avenue
This is the first stop as you travel along the scenic drive from the visitor’s center. From the parking area follow the wide, paved trail for about 100 yards to the viewpoint of Park Avenue.
It’s an impressive view, but to understand why it’s called Park Avenue, you must follow the trail down and walk between the immense sandstone monoliths on either side. The real Park Avenue in New York City is a wide boulevard with soaring skyscrapers on either side.
BEST TIME TO PHOTOGRAPH Park Avenue is middle to late afternoon. The valley is in shadow and the sun lights up the east wall.
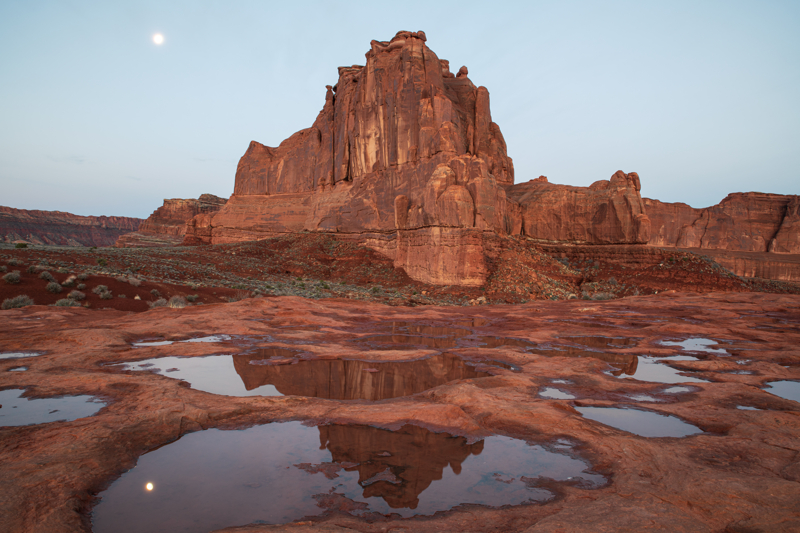
3 – La Sal Mountain Viewpoint
Definitely stop at this viewpoint where you’ll enjoy a 360-degree view. See the La Sal Mountains to the east and distinctive formations like Three Gossips, Sheep Rock, and The Organ in the Courthouse Towers area. Look to the horizon for a distant view of Balanced Rock and the Windows Section.
BEST TIME TO PHOTOGRAPH at the La Sal Mountain Viewpoint is sunrise. The light from the rising sun washes the rock formations with a warm red glow.
Don’t be too discouraged if you experience bad Arches National Park weather. La Sal Viewpoint is a terrific place to capture reflections in the pools after a rain storm!
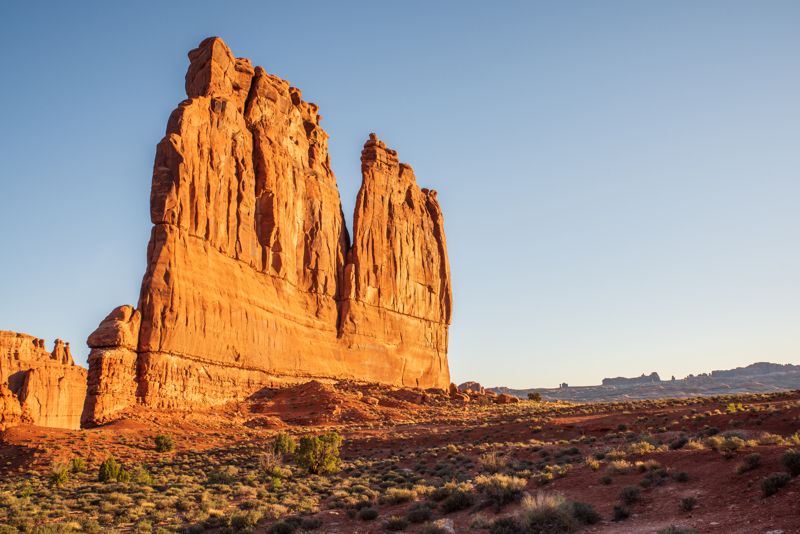
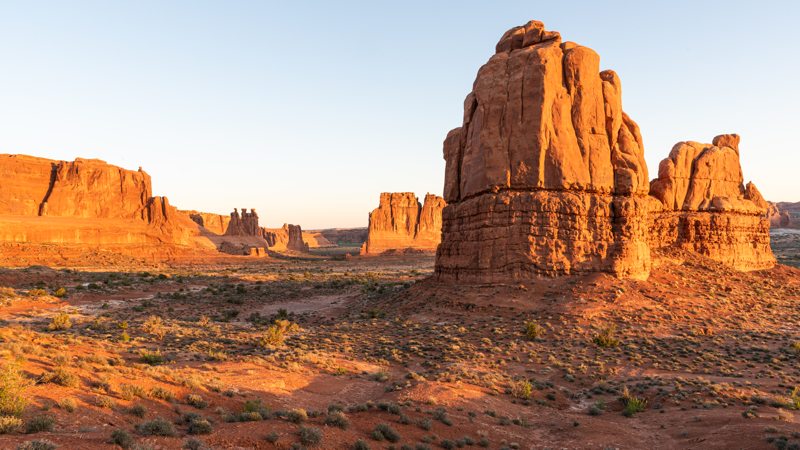
4 – Courthouse Towers Area
The Courthouse Towers area has unique rock formations to photograph: Three Gossips, Sheep Rock, and The Organ. We found the best places to take photos are from the La Sal Viewpoint to get a distant photo, or stop at the pullouts along the scenic drive.
BEST TIME TO PHOTOGRAPH the Courthouse Towers area is at sunrise. The warm light in the morning is the perfect time to capture the red glow on the formations.
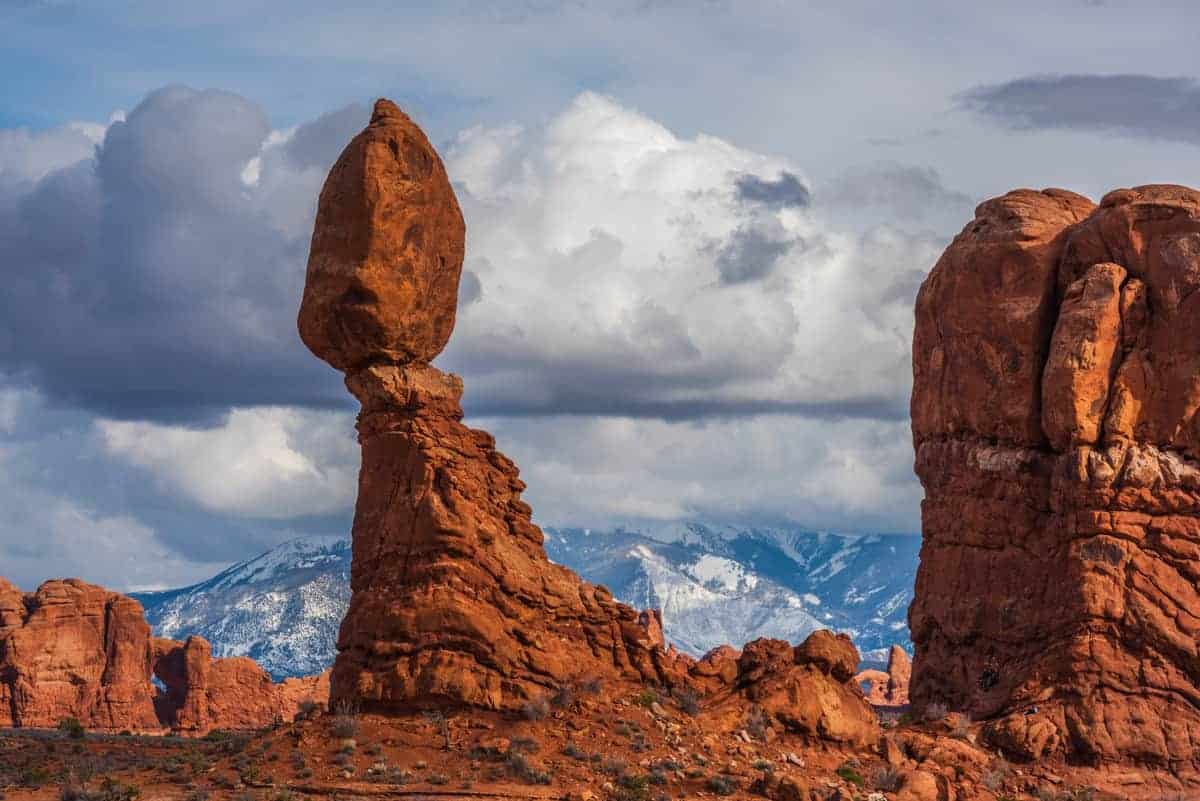
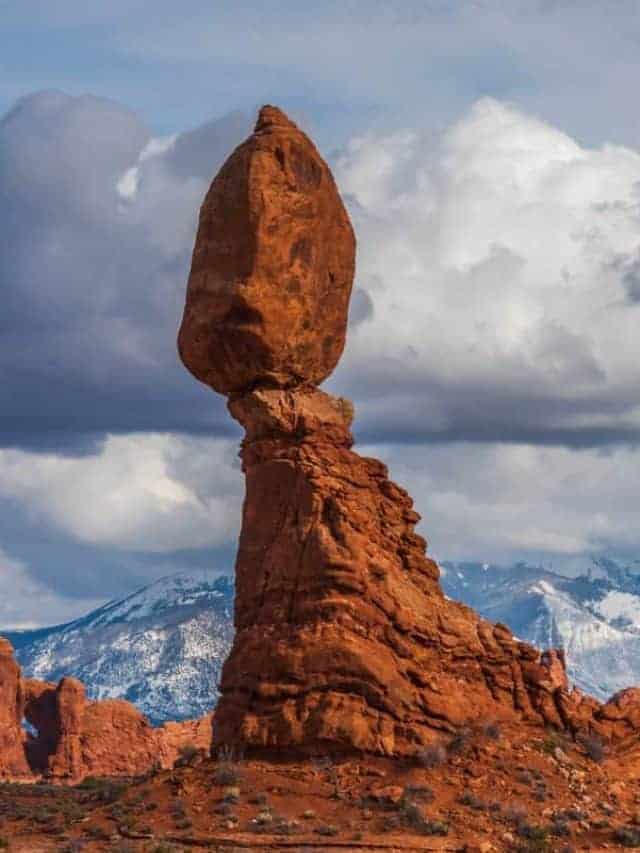
5 – Balanced Rock
Balanced Rock is located next to the park’s main road. It is a popular feature in the park. The .3 mile round trip trail is one of the easier Arches National Park hikes that allows you to hike a full loop around this landmark.
The impressive fact about this feature is the balanced, upper portion of the rock is as large as three school buses!
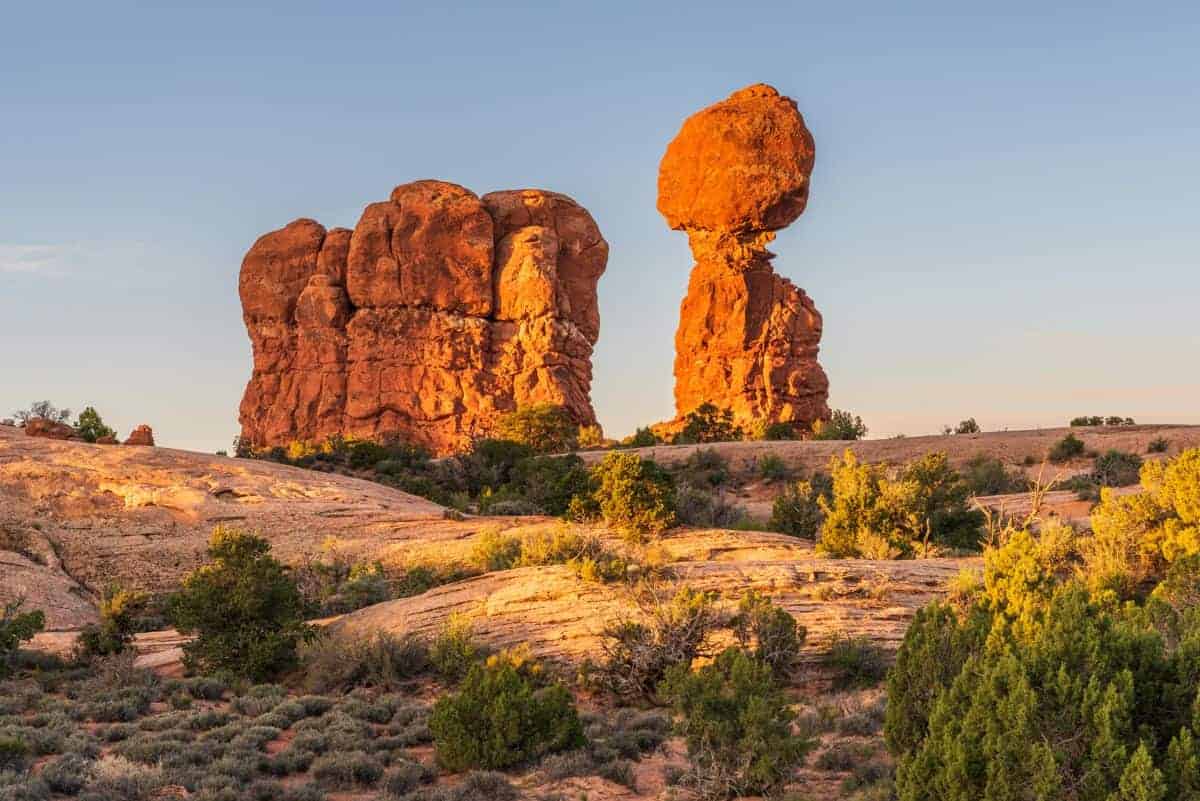
Sunset is a good time to photograph Balanced Rock at Arches National Park.
PHOTO TIPS:
- Use the various pullouts along the main road to capture different views of Balanced Rock.
- Walk the trail and take photos of the balancing rock from different angles.
BEST TIME TO PHOTOGRAPH Balanced Rock is sunset and evening.
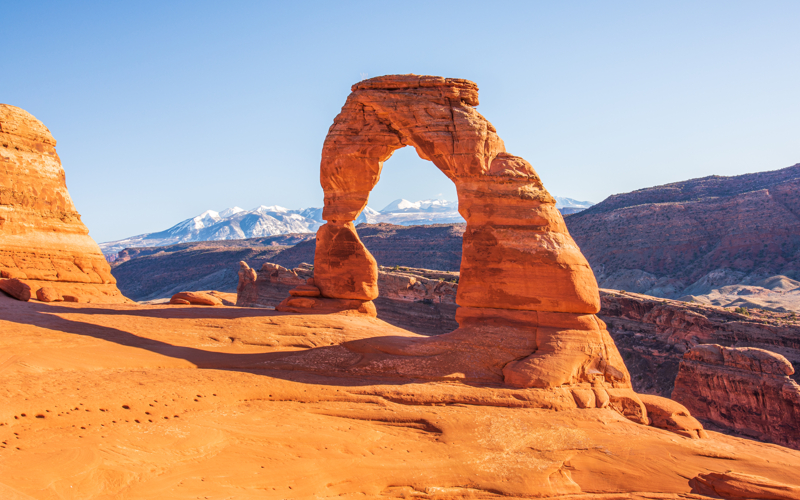
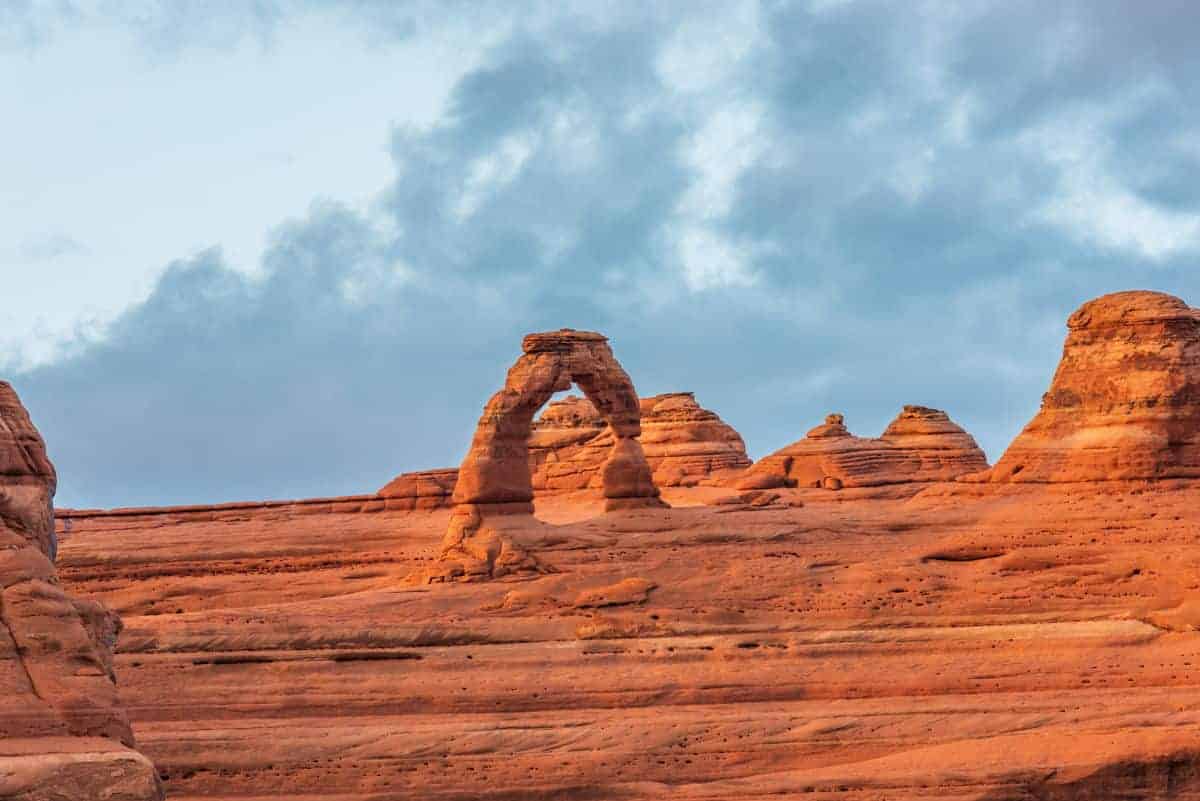
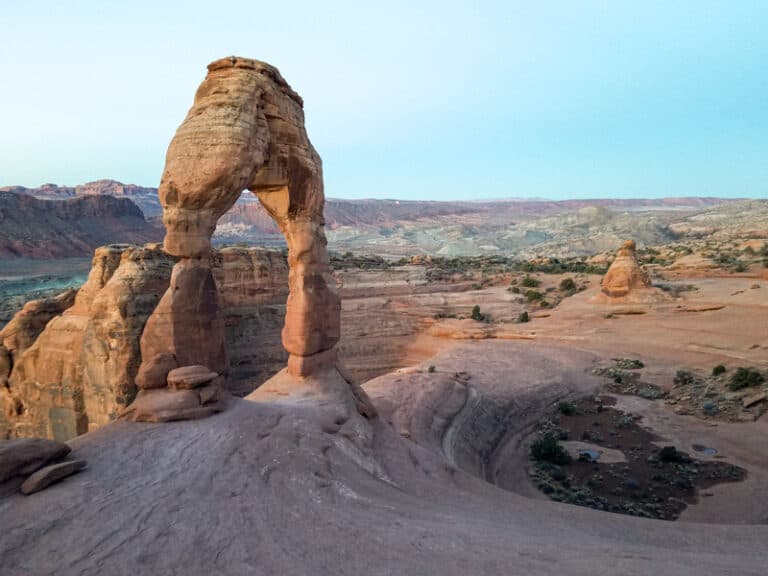
6 – Photographing Delicate Arch
Iconic Delicate Arch is usually at the top of the list when visiting Arches National Park. The impressive free-standing arch is a famous geologic wonder.
This arch cannot be viewed from the main road and requires a bit of walking to see if from a distance. Walk 100 yards along a level path at Lower Delicate Arch Viewpoint to see the arch one mile away. There is an Upper Viewpoint that takes you a little closer, requires walking ½ mile with some stairs.
The Arches National Park hiking trail to see the arch up close is 3 miles roundtrip and climbs 480 feet in elevation. The hike is mostly uphill and takes 1 to 1 ½ hours if you are reasonably fit.
Delicate Arch is a main attraction at Arches for tourists and photographers who want photos of arches in Utah. Be sure to practice patience and courtesy while you wait your turn to get your picture taken under the arch.
Delicate Arch is one of the best sunset spots in Arches National Park. It’s also the time when most photographers choose to line up along the bowl waiting for the magical moment. There could be hundreds of people in the small area during the summer.
PHOTO TIPS:
- Arrive at the Delicate Arch bowl at least an hour before sunset to get your spot.
- Walk around to find a unique composition.
- Take a headlamp for the hike down after sunset.
BEST TIME TO PHOTOGRAPH Delicate Arch is sunset and evening.
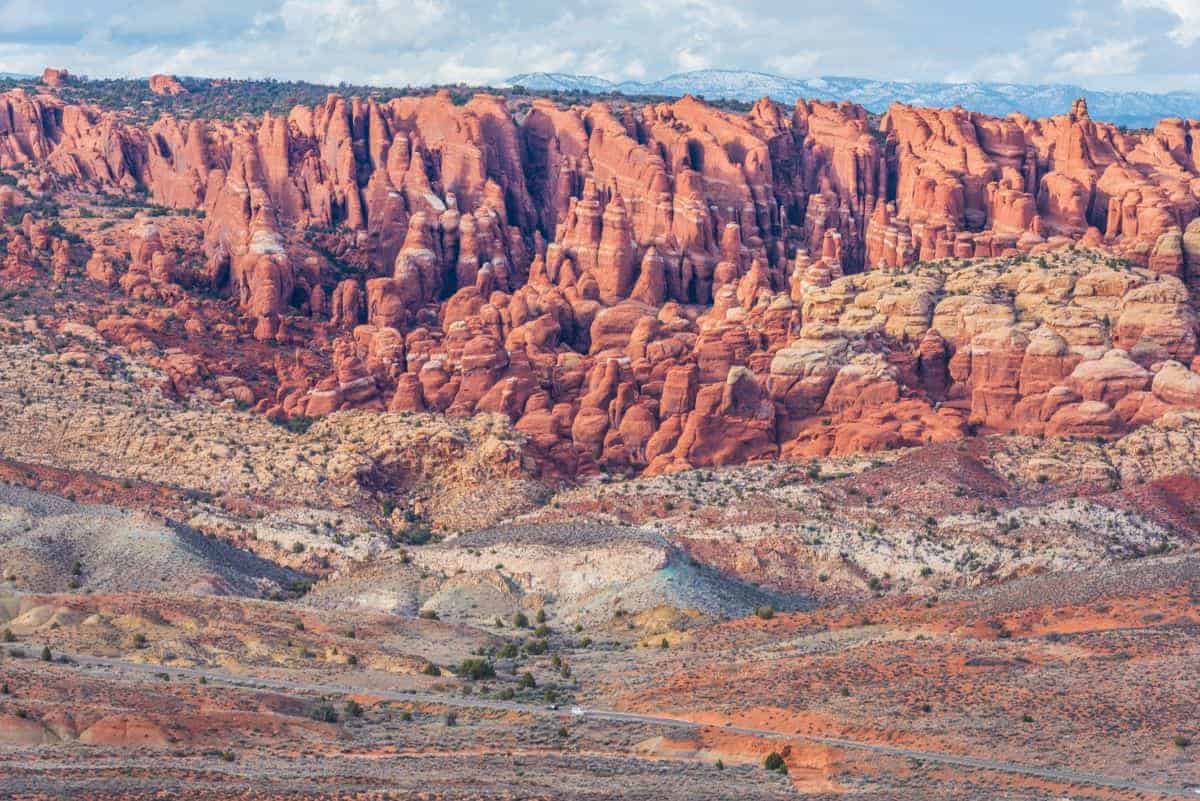
7 – Fiery Furnace
Narrow canyons and maze-like fins comprise the Fiery Furnace. Explore the area safely on a 3-hour, ranger-led hike (make reservations in advance). Learn the history of the park as you scramble over slickrock boulders, walk through sandy trails, squeeze between rocks and navigate narrow ledges.
If that sounds too adventurous or you don’t have time, this Arches National Park viewpoint is a short walk from the parking lot. From the Fiery Furnace overlook you see an area thick with fins, spires and arches.
BEST TIME TO PHOTOGRAPH the Fiery Furnace is sunset.
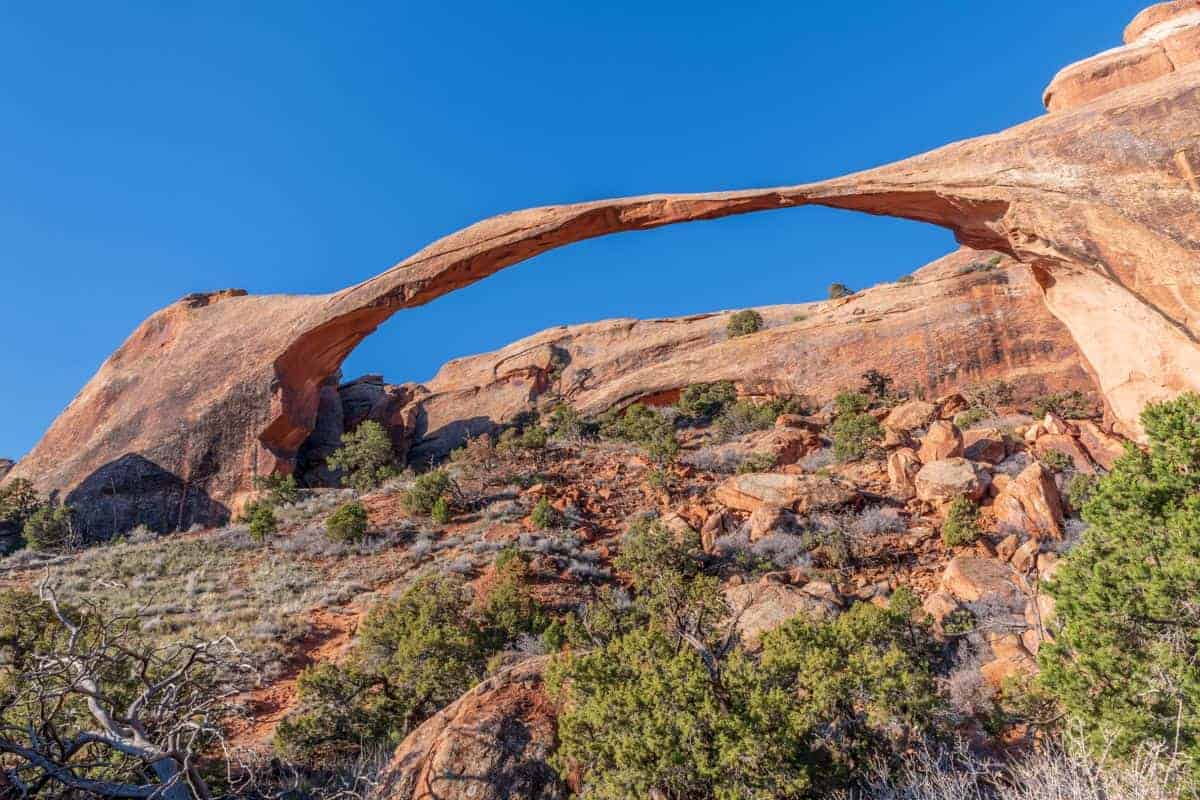
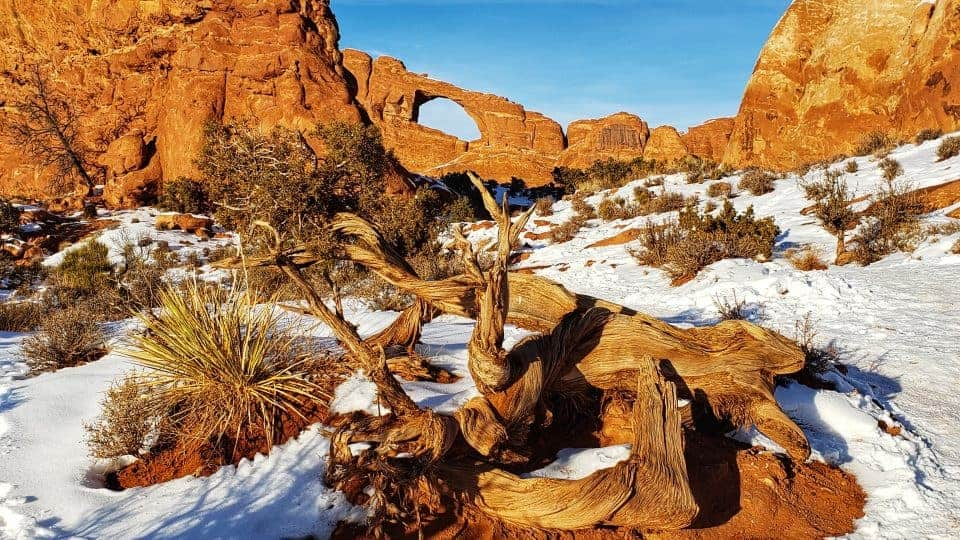
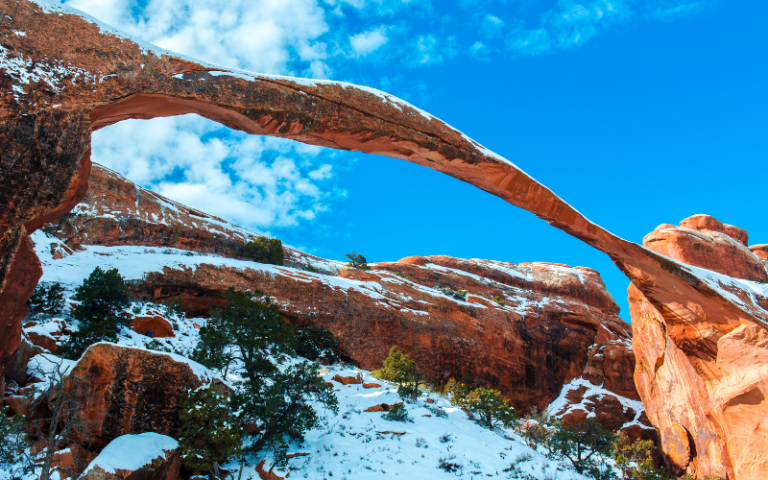
8 – Landscape Arch
One of the best hikes in Arches National Park is 1.6 miles along the Devil’s Garden Trail to see Landscape Arch. It is longer than a football field and the thinnest part of the archway is 8 feet thick.
As you walk along the trail near the arch, you’ll see different perspectives. There used to be a short trail that went under the arch, but falling rock from the underside has made it too dangerous for visitors to walk beneath the arch.
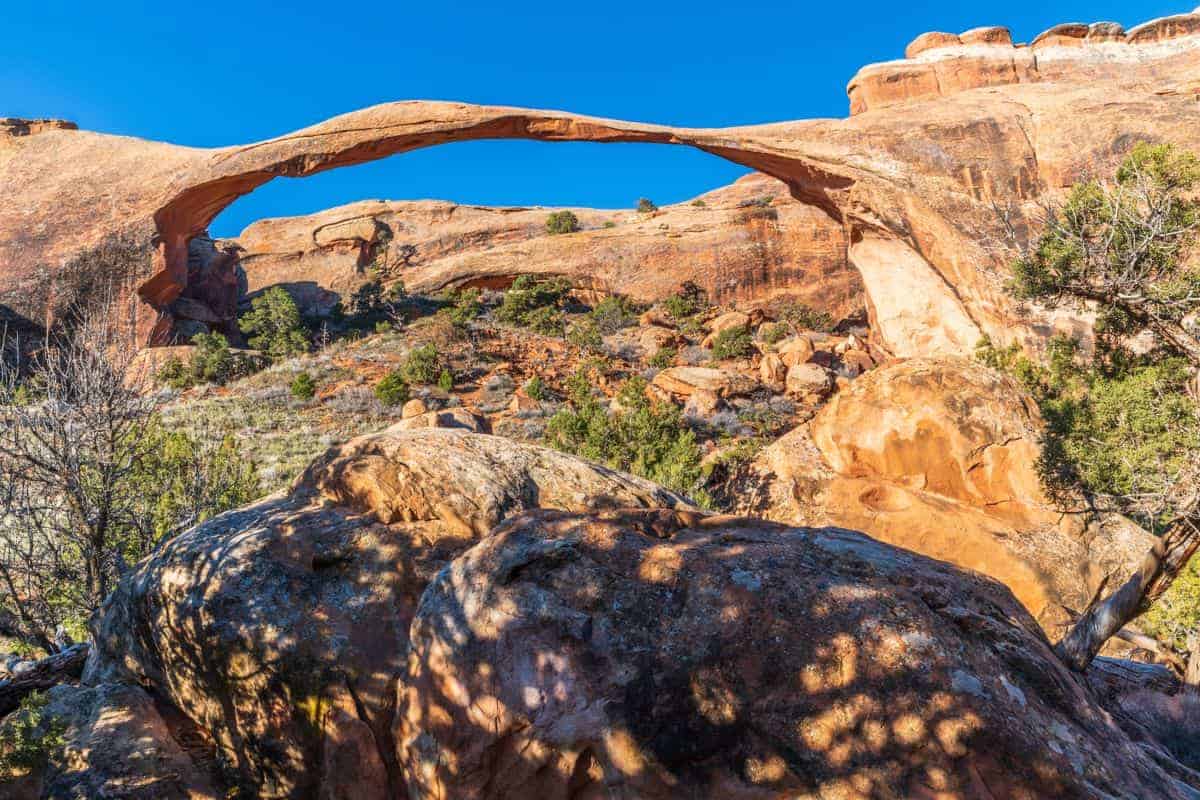
PHOTO TIPS:
- No shadows on the arch – late spring and early summer in early morning – the rest of the year at mid-morning.
- Photograph various angles of the arch – straight on, to the left and to the right.
BEST TIME TO PHOTOGRAPH Landscape Arch is sunrise and early morning.

9 – Devil’s Garden Trail
The Devil’s Garden trail is 7.2 miles round trip, including all spur trails, making it the longest maintained trail and Arches National Park hike. The largest concentration of significant arches in the world is found in the Devil’s Garden area.
Most tourists hike an easy 1 mile to the famous Landscape Arch. There are spur trails to see Tunnel Arch and Pine Tree Arch before arriving at Landscape Arch.
Those who want some adventure will continue along the trail that requires climbing up and over long, narrow sections of slickrock, called fins, with steep drop-offs. This section of trail leads to Navajo Arch, Partition Arch and Double O Arch.
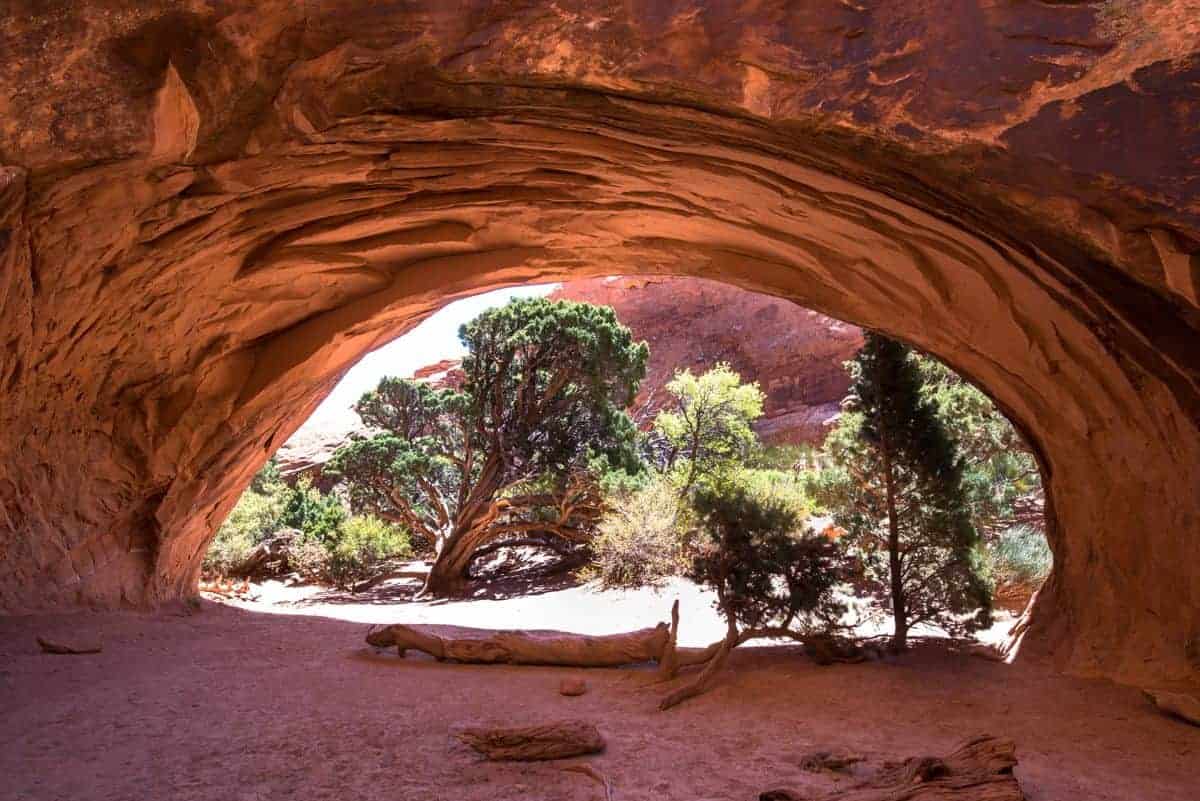
PHOTO TIPS:
- Navajo Arch: Capture the front, back and under-arch views.
- Partition Arch: Capture the front and back sides (there is a steep drop-off on the back side).
- Double O Arch: Pass through the lower opening of the arch and climb the slickrock on the other side to photograph the arch with sky as the background.
- Photograph the fins along the trail as these are just as amazing as the arches!
BEST TIME TO PHOTOGRAPH the Devil’s Garden area arches is sunrise and early morning.
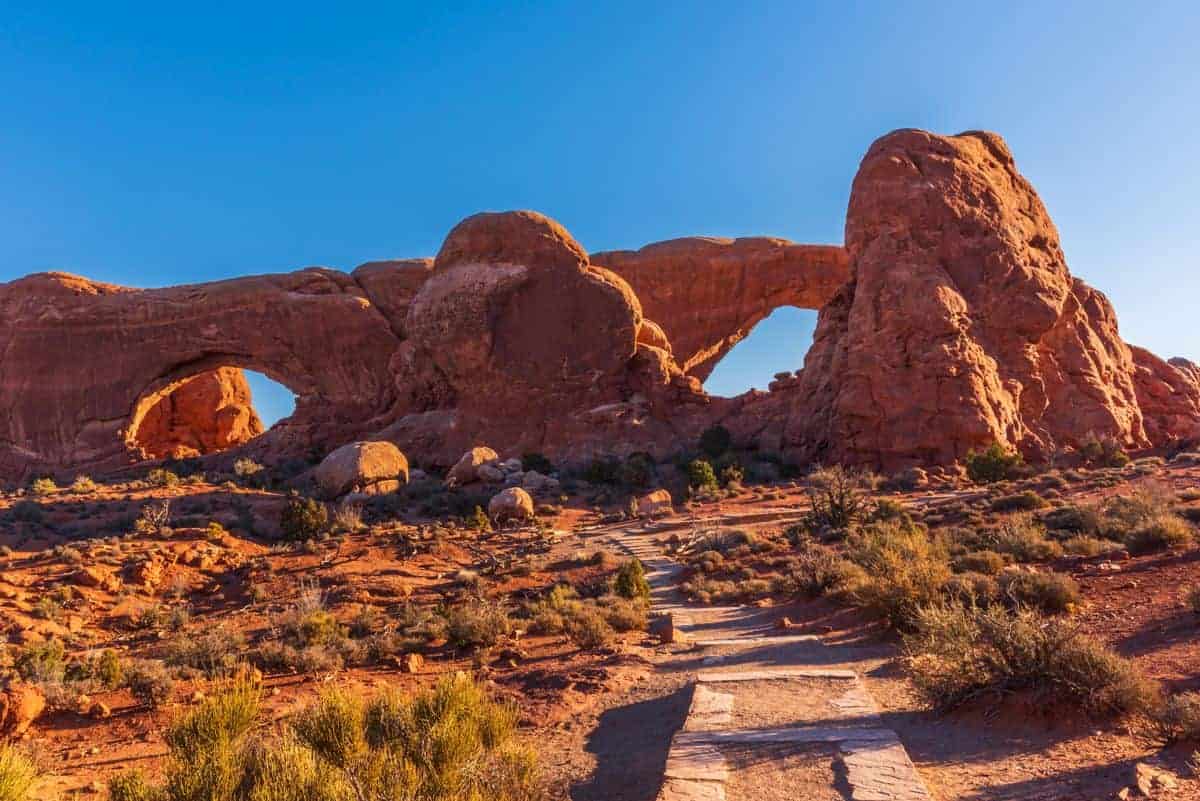
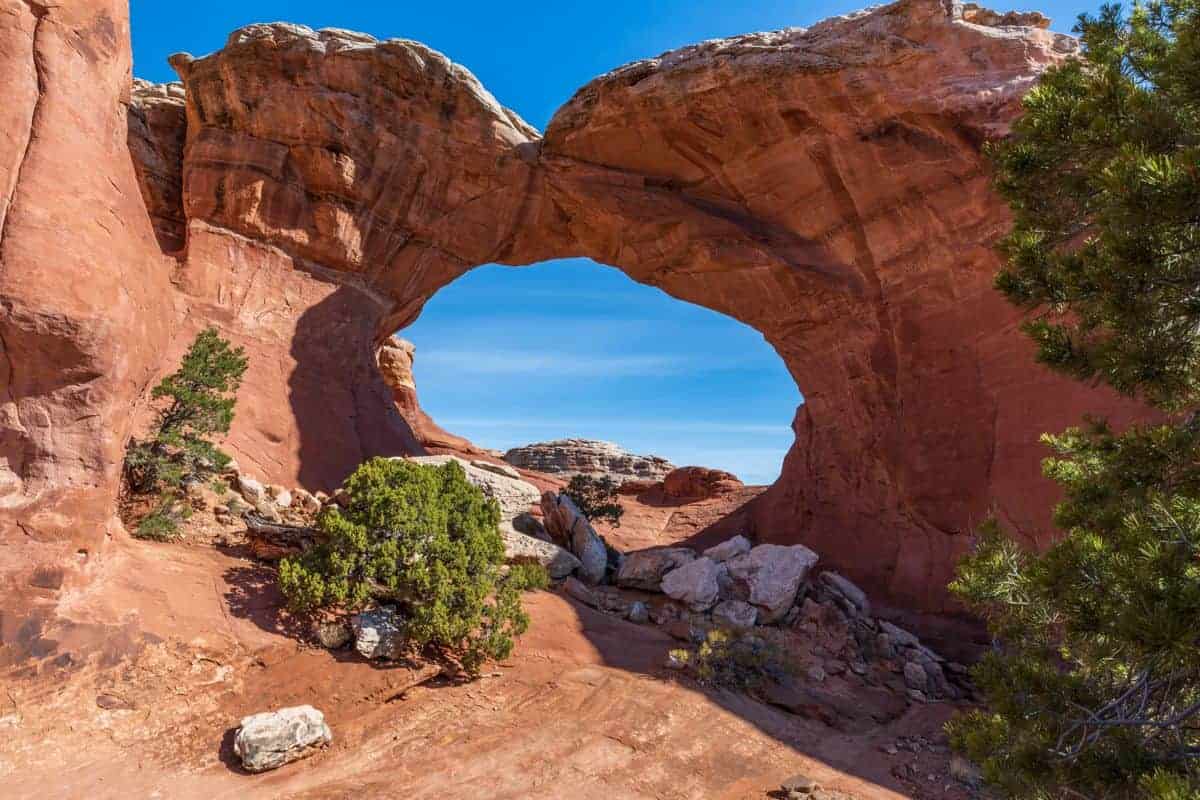
10 – The Windows
The Windows area and arches can be seen from the parking lot, but to appreciate their magnitude, hike inside and around the arches. The easy, 1 mile round trip Arches National Park hike takes you to the North and South Windows, also known as the Spectacles. Walk along the primitive trail from the South Window to the back side to see a more attractive view of these arches.
Get here early if you want photos of the arches without people. The Windows area is easily accessible and very popular Arches National Park photo spot.
PHOTO TIPS:
- Find a foreground element for a photo with only the larger North Window.
- Add context by having a person on the slope of the window, but if you don’t time your visit, you’ll have 50 people in this shot and that’s not ideal.
BEST TIME TO PHOTOGRAPH the spectacles is early morning – and the North and South Windows is late afternoon.
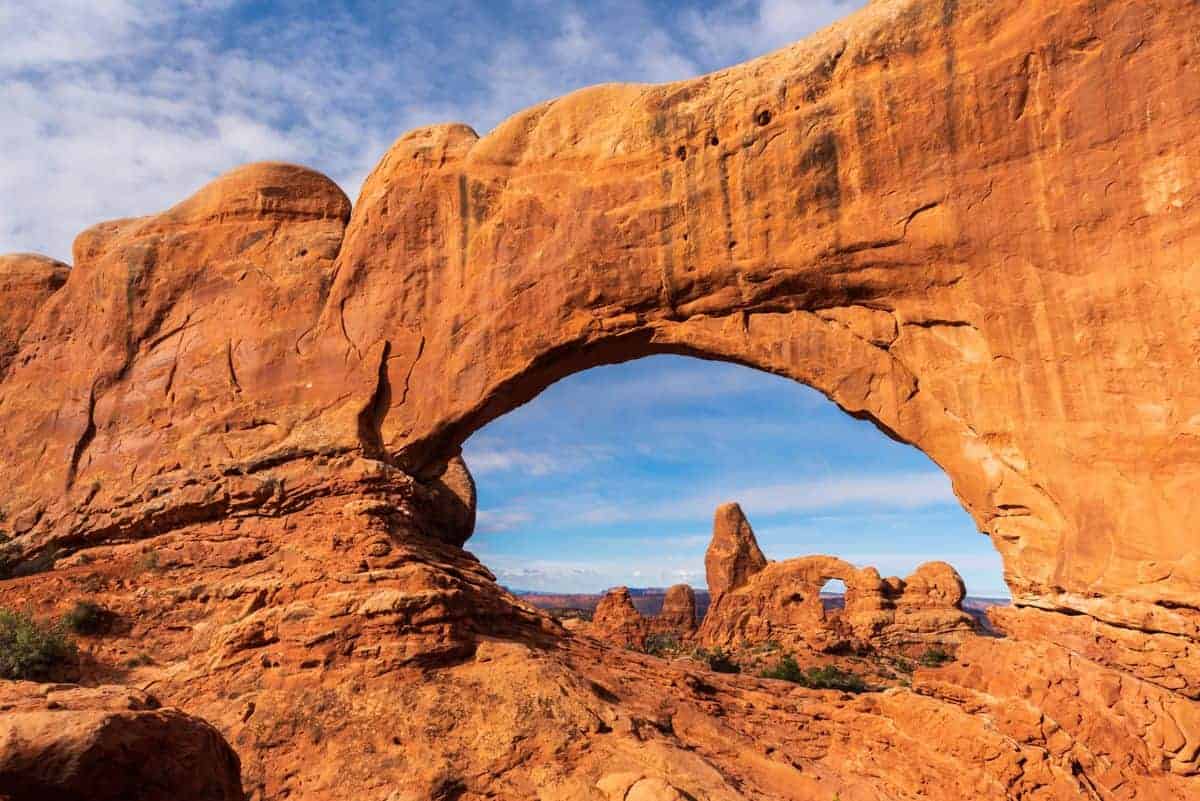
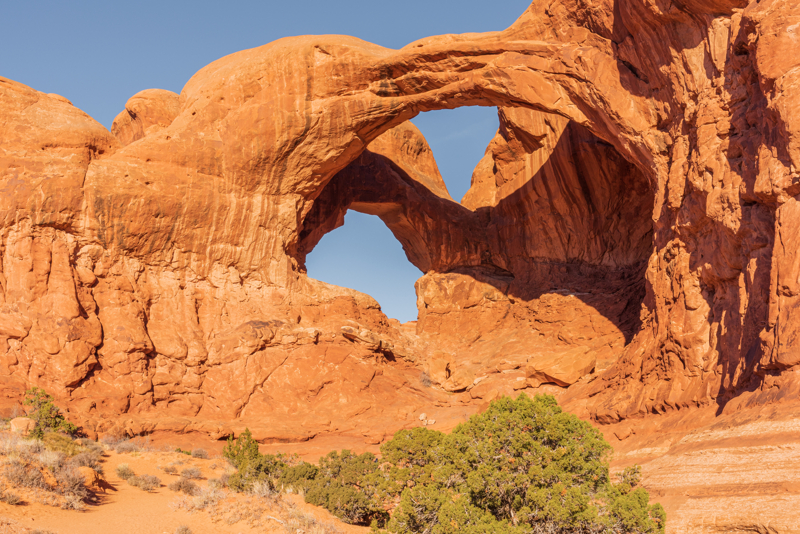
11 – Turret Arch
With a bit of precarious scrambling, Turret Arch can seen through the North Window at Arches National Park. It’s one of the best sunrise spots in Arches National Park since you can see the light dancing across the rocks.
PHOTO TIPS:
- Photograph Turret Arch through the North Window.
- Capture various perspectives and images as you walk around and climb Turret Arch.
- Turret Arch provides a wonderful shape to complement milky way photography.
BEST TIME TO PHOTOGRAPH the Turret Arch is early morning or evening for night or milky way photography.
12 – Double Arch
Double Arch consists of two arches that share the same stone foundation. It was formed by downward water erosion instead of side-to-side water erosion like most of the other arches in the park.
As you hike to Double Arch look to your left to see the Parade of Elephants, a rock formation that resembles a herd of elephants holding each others’ tails. Enjoy the short, leisurely trail.
PHOTO TIPS:
This is a complicated formation that has lighting issues most of the day. Work with the shadows, foreground and scale to capture the arches the best you can.
If it’s crowded and you don’t want people in your shot, focus on the top part of the arches to create a unique perspective.
BEST TIME TO PHOTOGRAPH the Turret Arch is early morning.
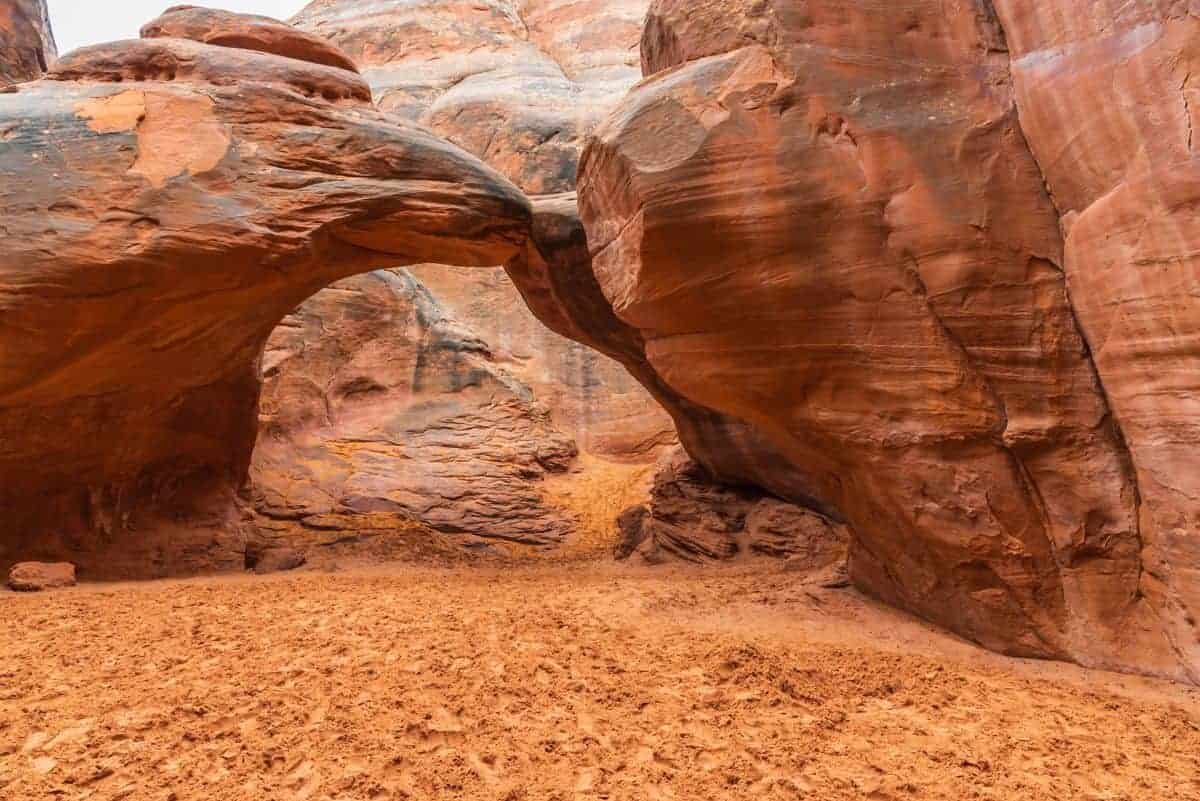
13 – Sand Dune Arch
On a hot summer day, this is a must-stop if you’ll be at Arches National Park with kids. The easy hike takes you to a sandy area with many places to explore, play and hide. Do not climb on top of the arch as that’s against park policy.
PHOTO TIP: The sandstone fins in the area are worthy of photographs too, not just the arch. You can capture wonderful landscape photos at Sand Dune Arch.
BEST TIME TO PHOTOGRAPH Sand Dune Arch is early morning or late afternoon when the sun isn’t directly lighting the arch between the fins.
14 – Broken Arch
The Broken Arch trail is accessed from the same trailhead as Sand Dune Arch. You can see it way off in the distance. The trail is fairly level most of the way, then has a few sloping sections as you get closer to the arch.
PHOTO TIP: Be sure to take photos from the other side of Broken Arch if you can. There is a moderately steep slickrock section to get through the arch.

BEST TIME TO PHOTOGRAPH Broken Arch is early morning, evening and sunset.
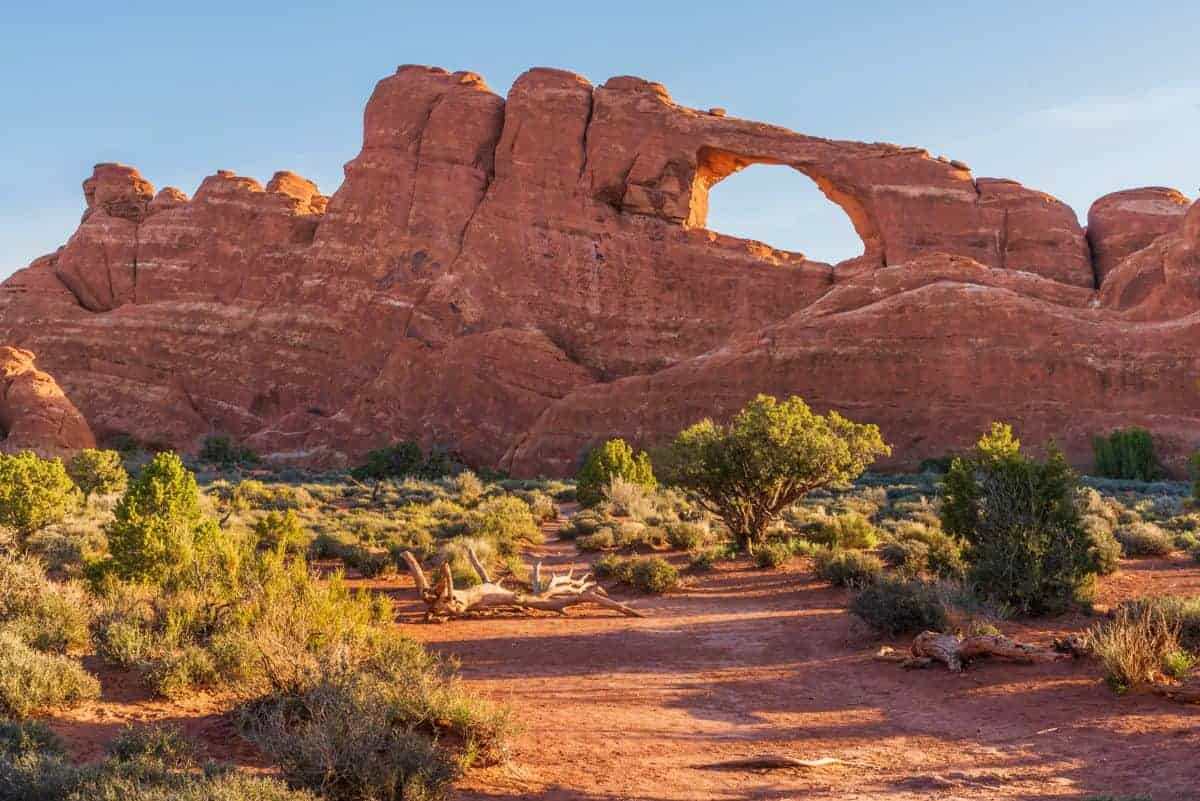
15 – Skyline Arch
Skyline Arch sits high atop rocks in the Devils Garden area and it’s visible from many areas of the park.
PHOTO TIP: You can take a photo of this arch from the pullout, but we recommend you hike along the short and easy trail to get closer to the arch.
BEST TIME TO PHOTOGRAPH Skyline Arch is late afternoon.
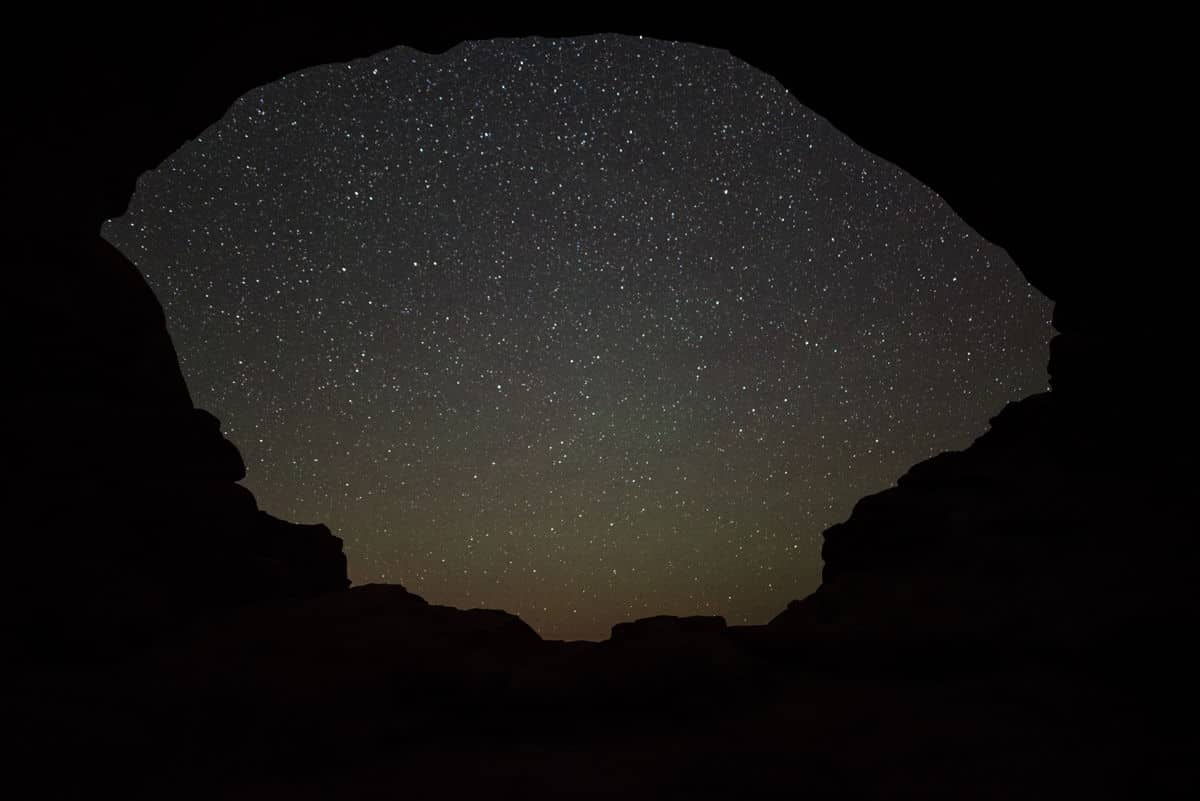
Arches National Park Night Photography
On a clear night, linger in the park after dark and look up to see the sky bursting with stars to see why this park is one of the top Moab night photography spots.
Arches is recognized as an International Dark Sky Park. The park’s accessibility, remote location, altitude and weather are why they say “Half the Park is After Dark”.
Photographers from around the world come to Arches to photograph the Milky Way. Arches National Park is home to some of the best Moab stargazing spots and is the perfect place to try some Moab night photography.
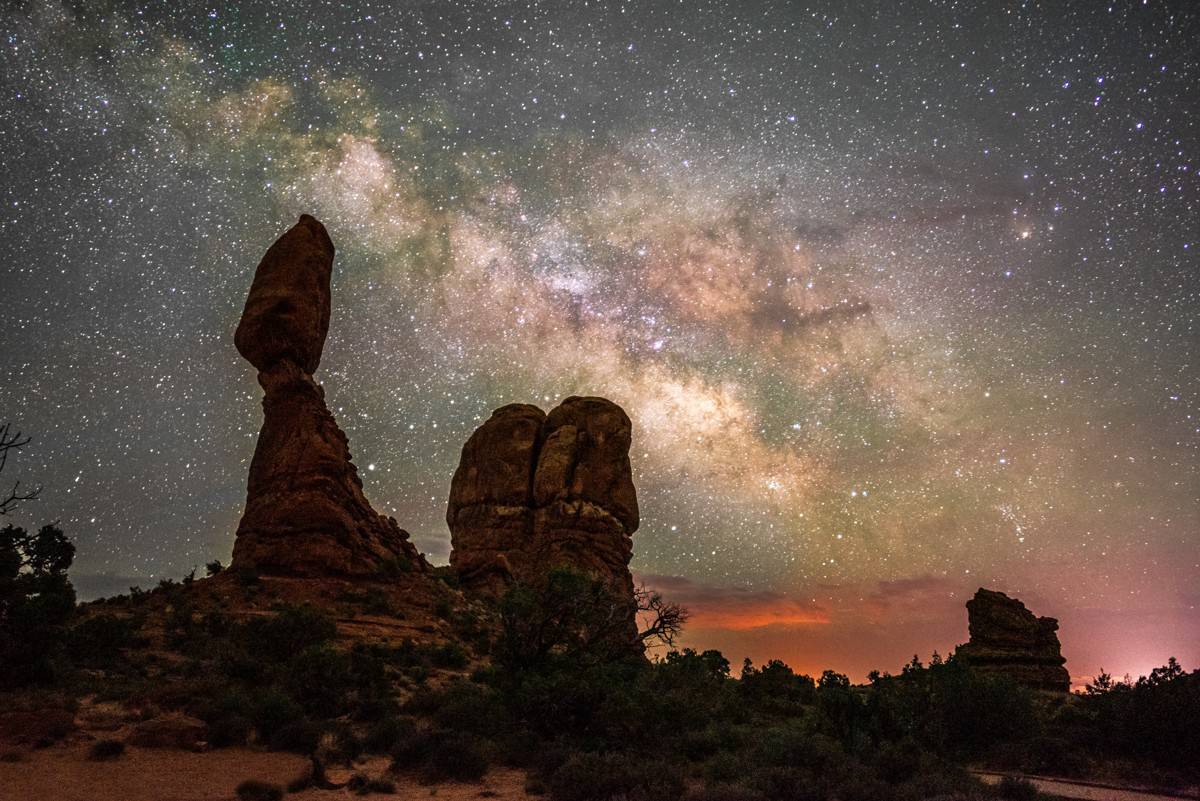
Night photography capturing the milky way at Arches can’t be beat! Some top Moab night photography spots and vantage points for stargazing at Arches National Park:
- Balanced Rock
- The Windows
- Garden of Eden Viewpoint
- Panorama Point
Best Time to Photograph Arches National Park
It’s important to know what to expect during the various seasons of the year so you can decide the best time to visit Arches National Park for what you want to see, do and photograph.
The Arches National Park weather varies drastically from spring, summer, fall and winter.
Spring Weather at Arches: temperatures vary quite a bit from month to month in the spring. It’s important to pack for all types of weather because you never know when the weather will change.
- Arches in March: Highs 64 | Lows 35 degrees F
- Arches in April: Highs 71 | Lows 42 degrees F
- Arches in May: Highs 82 | Lows 51 degrees F
It is not unusual to get rain or even snowfall in March. We recommend you watch the weather and pack a winter coat, winter hat, and winter gloves when going to Arches in early spring. A fleece jacket, hat, and gloves should be fine later in the spring.
Summer Weather at Arches: temperatures will be HOT! Since the temperatures are brutal this time of year, plan your outdoor activities for the cooler mornings and evenings!
- Arches in June: Highs 93 | Lows 60 degrees F
- Arches in July: Highs 100 | Lows 67 degrees F
- Arches in August: Highs 97 | Lows 66 degrees F
With the hot summer temperatures, you’ll want to protect yourself from the sun by wearing a sunhat, sunscreen and sunglasses. It’s important to stay hydrated and carry a hydration pack or a refillable water bottle in your backpack.
Fall Weather at Arches: it starts to cool down making it a great time to explore the park because it will be cooler in the mornings and evenings, and the daytime temperatures aren’t too hot compared to the summer.
- Arches in September: Highs 85 | Lows 54 degrees F
- Arches in October: Highs 71 | Lows 40 degrees F
- Arches in November: Highs 55 | Lows 30 degrees F
With the cooler temperatures at night, you will definitely want to bring a fleece jacket, warm hat and gloves for the nights and early mornings.
Winter Weather at Arches: there are some drawbacks to keep in mind when visiting in the winter: visitor services are reduced and you’ll need to be more self-reliant in the winter. And the cold winter weather may not be for everyone.
- Arches in December: Highs 45 | Lows 23 degrees F
- Arches in January: Highs 44 | Lows 22 degrees F
- Arches in February: Highs 52 | Lows 28 degrees F
During the winter it is especially important to dress in layers. We recommend an insulted winter jacket, fleece jacket, warm hat and gloves if you’ll be doing any outside activities. Here’s the full list of the outdoor winter clothing we use!
Check out these awesome photographer gloves and rechargeable hand warmers we use!

Where to Stay Near Arches National Park:
There are no hotels in Arches so most people stay in the nearby town of Moab. There are all types of lodging in and near Moab from budget-friendly hotels to higher-prices resorts. You’ll also find vacation rentals, a hostel, campgrounds and RV parks.
- Places to Stay Near Arches National Park
- Hotels Near Arches National Park
- Places to Stay Near Arches National Park with Kids
- Arches National Park Camping
Here are a few of our favorite places to stay near Arches:
- Holiday Inn Express Hotel & Suites Moab – we enjoyed our stay and highly recommend this hotel due to its location close to Arches.
- Purple Sage – our all-time favorite place to stay in Moab – walking distance to shopping, full kitchen, and only 8 units so you don’t feel lost in a large hotel.
- Red Cliffs Lodge – rooms up to 6 people – located 17 miles from Moab, this lodge is known for its beautiful location, winery and actiities like horseback riding, fishing and more!
- Vacation Rentals Near Arches – we really like rentals with a kitchen, washer and dryer and amenities like a swimming pool and hot tub.
Planning an Arches National Park Vacation:
- Best Time to Visit Arches National Park
- Things to Do at Arches National Park
- Arches National Park Packing List
- Arches National Park with Kids
- Arches National Park Photography
- Arches National Park Tours
BUY AT AMAZON: Arches and Canyonlands Guides and Maps
I’m an advanced amature photographer and will be visiting the two parks near Moab May 16th, 17th, 18th, and 19th. I have a Canon 5D Mark II and a 7D camera. I use a 10mm to 20mm 1:4-5.6 Sigma lens on this camera and either my Canon 24-70mm f/4 or for long distance shots a Canon 70-200mm f/2.8 or 150-500mm 1:5-6.3 APOHSM Sigma DG lens. I rarely do night photography however, I’m considering using my 70-200mm f/2.8 weather permitting and shooting the night sky from Balancing Rick. Your thoughts on this. Do you do evening tours of Arches?
Thank You
Rayburn Mitchell
I think it really depends on the images you envision capturing. As a general rule wider focal lengths work better shooting the night sky, especially if you desire to capture the Milkyway, as they enable compositions that include larger portions of the night sky. Your 70-200mm will work great though, as it’s a fast lens and will allow tighter compositions focused around Balanced Rock. That lens will also work well for shooting vertical and horizontal panoramic sequences to blend together. The 10mm to 20mm lens is a nice focal length range for night sky photography, though the maximum aperture for those lenses is less than ideal. It’s doable at f4 and it sounds like you may have the experience and skill to pull it off. Generally, the faster and wider the lens, the better it is for night sky photography. We do not personally offer tours, but here’s a list of Arches NP tours you can check out – one tour is for sunset & night photography! https://photojeepers.com/arches-national-park-tours/
Hi Jamie,
My wife and I will be visiting Arches in a few weeks. We have two nights and two mornings there. I’d like to do Corona Arch on one night. Where would you recommend for the one extra night and two mornings? I’m primarily interested in Milky Way and landscape shots. Thanks for sharing your insight here.
Sincerely,
Andrew Rice
Sunset/Night: Arches Windows area and Balanced Rock – so many elements for sunset and milky way – and you can do both locations for milky way the same night.
Sunrise: Mesa Arch, but you’ll need to get there way early! Other good sunrise locations: Arches La Sal Overlook you catch the sun coming over the horizon, and the golden light reflected on all the stone formations there. Arches Windows area is also nice for sunrise to get the golden light on the arches there. Canyonlands Grand View Point is awesome to catch the sunrise sunbursts. And Dead Horse Point is a nice sunrise location as well. Have so much fun! You might want to check out our Arches/Canyonlands photography guide: https://photojeepers.com/arches-canyonlands-itinerary-photography-guide/
Such stunning photos! I really want to go here, thanks for sharing these fabulous tips!
Happy to answer any questions when you get the chance to go!
You might have heard it before, but you have a good insight into photography! That it’s more than just whipping out a cam and taking a snap. I’m not surprised so many photographers and travelers hit this spot!
https://dreamtraveleat.blogspot.com.au/
Thank you Viviane. Arches is filled with photo opportunities if you take the time to stop and really ‘see’ the park and the creative inspiration.
I was to Utah in 2017. I wish i could live in such a beautiful state. I plan to visit in 2018 any suggestions. I seen Capital Reef, Arches n.p, Zion and suggestions. I was hooked on Moab and busting to go back.
Grateful of any suggestions.
Thank you,
Emer
Canyonlands near Moab: https://photojeepers.com/category/destinations/canyonlands/ and Bryce Canyon: https://photojeepers.com/category/destinations/bryce-canyon/!!
Looks like you got the perfect shot under the arch of the two of you together! That photo really shows how massive these structures actually are – just amazing! Also very inspired by your beautiful starry night photos 🙂
The structures are massive, and it does help to have people in the photo to see that. The starry nights are amazing in person!
Oh Arches is a phenomenal place for night-sky photography. It’s amazing how many photographers you’ll meet in pitch black night taking pictures of rocks. I had so much fun chatting with everyone about their settings and lenses and best angles…
Here is my favorite image from that night https://www.instagram.com/p/BK7IocnA7hV/?taken-by=pictheamericas
Inge – nice photo at Turrett Arch with the Milky Way! It is amazing that every time we are in the park after dark, we end up making friends with fellow photographers. So fun!